When I test my code I make use of a suite of tools to make the work as easy as possible. There are many tools out there, and at least I am not interested in learning to use more of them than I have to. All devs have their favorite tools for testing, and one of mine is Moq. When a new framework or platform is released I would very much still be able to instrument the mocking framework the way I am used to.
If you try to use Moq through the official NuGet feed in an ASP.NET Core- or Universal Windows Platform (UWP) project you will find yourself in trouble. Some of the error messages you might see are:
The dependency Moq 4.2.1510.2205 in project MyWebApplication does not support framework DNXCore,Version=v5.0
Moq 4.2.1510.2205 is not compatible with UAP,Version=v10.0.
Moq does simply not support .NET Core yet. Now, what to do?
The ASP .NET Devs at Microsoft to the Rescue
I have come across a fork of the Moq project which luckily has added support for .NET Core. What is even better, there is a public NuGet feed at https://www.myget.org/F/aspnetcidev/api/v3/index.json where packages from that project are available.
One way to use a nonstandard NuGet package source is to create a NuGet.Config-file in the root of your solution folder looking something like this:
Or you can add the AspNetVNext source-tag in your user profile NuGet file at %AppData%\NuGet\NuGet.Config.
Note that the Moq package with .NET Core support is in preview. To reference it, add "moq.netcore": "4.4.0-beta8" as a dependency in your project.json-file.
Thank you Microsoft Devs for allowing me to use Moq on the .NET Core framework!
xUnit and the Universal Windows Platform
Another tool which I’m fond of is xUnit. To get xUnit to work with UWP you have to add it to a Unit Test App project. Adding it to a class library the way you might be used to does not work. The procedure is described in detail in the xUnit documentation.
A question that I get fairly often is how to automatically stop virtual machines in Azure so that they get deallocated and practically does not cost anything. There are many ways to do this, and in this blog post, I am going to describe how to do it with Azure Automation Runbooks.
The virtual machines that are best suited to automate starting and stopping of, are the ones that does not need to give a response quickly. Test environments, machines with background worker roles, and build infrastructure are some good examples. Production web servers are not, at least not by automation runbooks. Im sure you get that it is wiser to rely on the autoscaling load balancing for those servers instead.
Different Approaches to Starting Runbooks
Azure has a feature called Automation that can contain runbooks. A runbook is, simply put, a PowerShell script with some extra hosting features such as logging and a platform to run on. Runbooks can be started by schedule, or through a HTTP Post webhook, or if you want to complicate things, by a PowerShell command in another runbook.
When I first started automating starting and stopping Azure resources I used daily repeating schedules because of their simplicity. But that approach has its limitations. The biggest one is that it is hard to predict when a machine is actually needed. For example, if you schedule your virtual machines to be running monday to friday from say 08:00 to 18:00 you will find that the schedule needs to be tinkered with more often that you think. Vacations, illness, and conferences are are just some occasions where you might have to disable your schedules to save some extra credits.
The better way would be to start your virtual machines first when they are really needed. And then when they are no longer used, to stop them as soon as you know this. This type of automation can be archived by starting the runbooks primarily by webhooks, and only use repeated schedules as a safety if your webhook automation would happen to fail.
The possibilities to invoke rest methods are endless. Make your phone call a start VMs webook when it connects to your work WIFI. Make traffic on a web server call a webhook to postpone your stop VMs runbook schedule. You can surely think of other interesting ways.
Delayed Webhook Runbook Startup
Schedules does not need to be repeated. In fact, a schedule which is configured to start a runbook only once is a great tool to delay the startup of that runbook after a webhook has been used.
How to Get Started
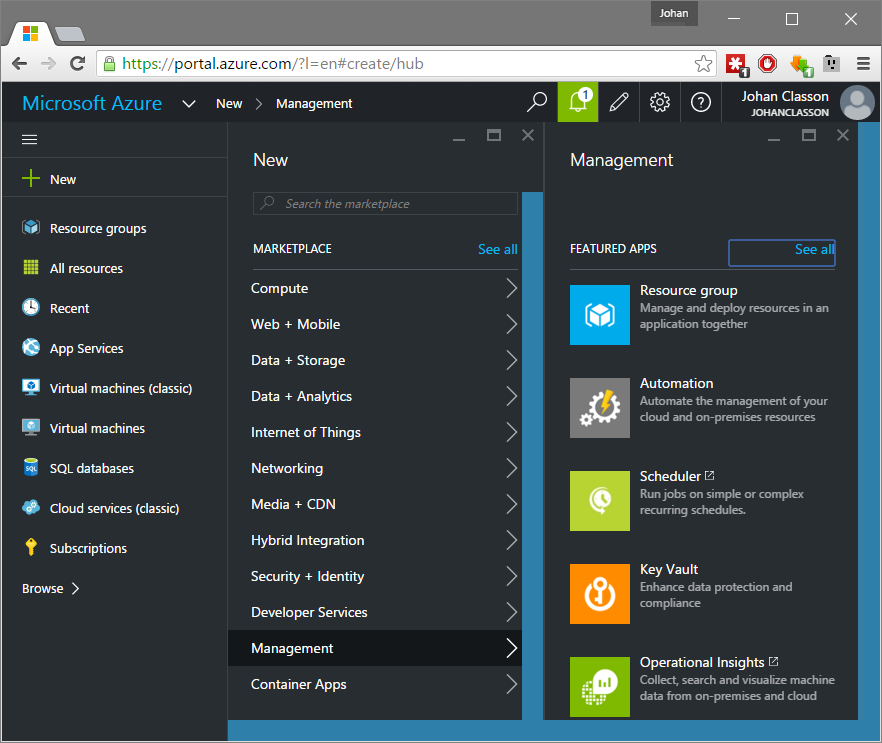
In the Azure portal, you find the Automation account under New - Management.
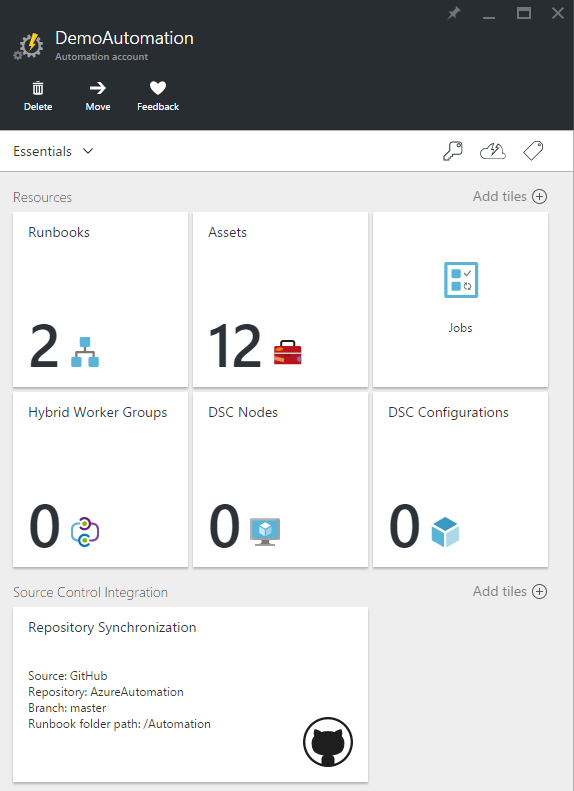
To make it possible to reuse PowerShell scripts between automation accounts, It is convenient to link your automation account to a GitHub repository where you can store all your runbook scripts. You can do this by clicking the Set Up Source Control tile, entering your repository details, and then clicking on Sync. This will add a runbook for every PowerShell script, each with the authoring status New. To be able to run one of the imported runbooks, you have to publish it. You can do that by clicking it, then Edit - Publish.
Each automation account has a number of modules by default, which can be found under Assets - Modules. If your PowerShell scripts depend on another module, you can upload it there.
To make it possible to start a runbook, you click it and then click either Schedule or Webhook. You can then configure any parameters that your PowerShell script needs in that schedule or webhook instance.
A Practical Example
In my Visual Studio Team Services (VSTS) account, I have a project called Akkomation which I use to build a home automation software that I store the source code for on GitHub (more about that in a later blog post).
Each time I check in, a build is triggered in VSTS which runs the tests, and performs analysis on a SonarQube server which I host in Azure.
Since I am the only contributor to the project code is pushed rather seldom, so it does not make sense to have the SonarQube server up and running 24/7. When I do push, I am often interested to see analysis results such as code coverage and code analysis issues.
Build Workflow
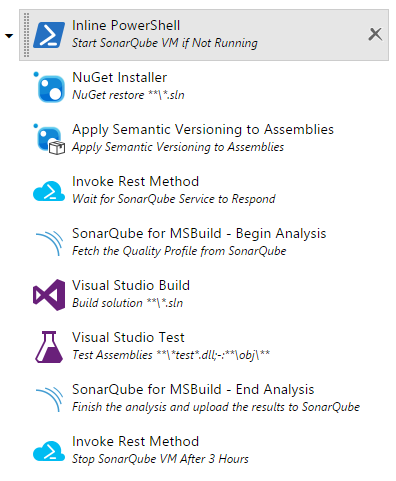
The build workflow is to first check if the SonarQube server is running, and if not, start it up with a webhook. VSTS includes an Azure Resource Group Deployment task which can start Azure Resource Manager virtual machines. A benefit of starting the SonarQube server with a webhook is that the build can continue while it is booting up.
Just before the SonarQube analysis begins, the build waits for the service endpoint to come up. Then when the analysis is complete, an runbook which stops the virtual machine is scheduled to start three hours later.
If another build is triggered before then, the SonarQube server is reused, and the stop runbook is rescheduled to run three hours after that the second build completes.
This workflow use two custom tasks:
Inline PowerShell, which runs a PowerShell script that is entered in the task instead of running a ps1-file as the normal PowerShell task does. I do not like to check in files in a repo just to make a build workflow possible. At least not in a small project like this one.
Invoke Rest Method, which calls a rest method. Surprise! What it also does is that it tries to invoke it once every ten seconds until it succeeds, up until a configurable timeout.
The longer a project continues, the more apparently innocent smells are added to the source code. Eventually, you will be in a swamp which is very hard to get out of. Technical debt is a devious thing that sneaks up on you.
How would you like it if check-ins with smelly code are rejected automatically? That might be an efficient way to battle some of the technical debt anyway.
For a while now, Team Foundation Server (TFS) provides gated check-in builds. Such builds are triggered just before code is checked in. If the build fails, the check-in is rejected.
To be honest, I have never been a huge fan of gated check-ins. Most people remember to compile and run the tests before they check-in, so in my opinion, gated check-in builds were just something that were in the way.
However, with the more intelligent analysis of SonarQube, I think it is time to reevaluate that opinion and make use of gated check-in builds again.
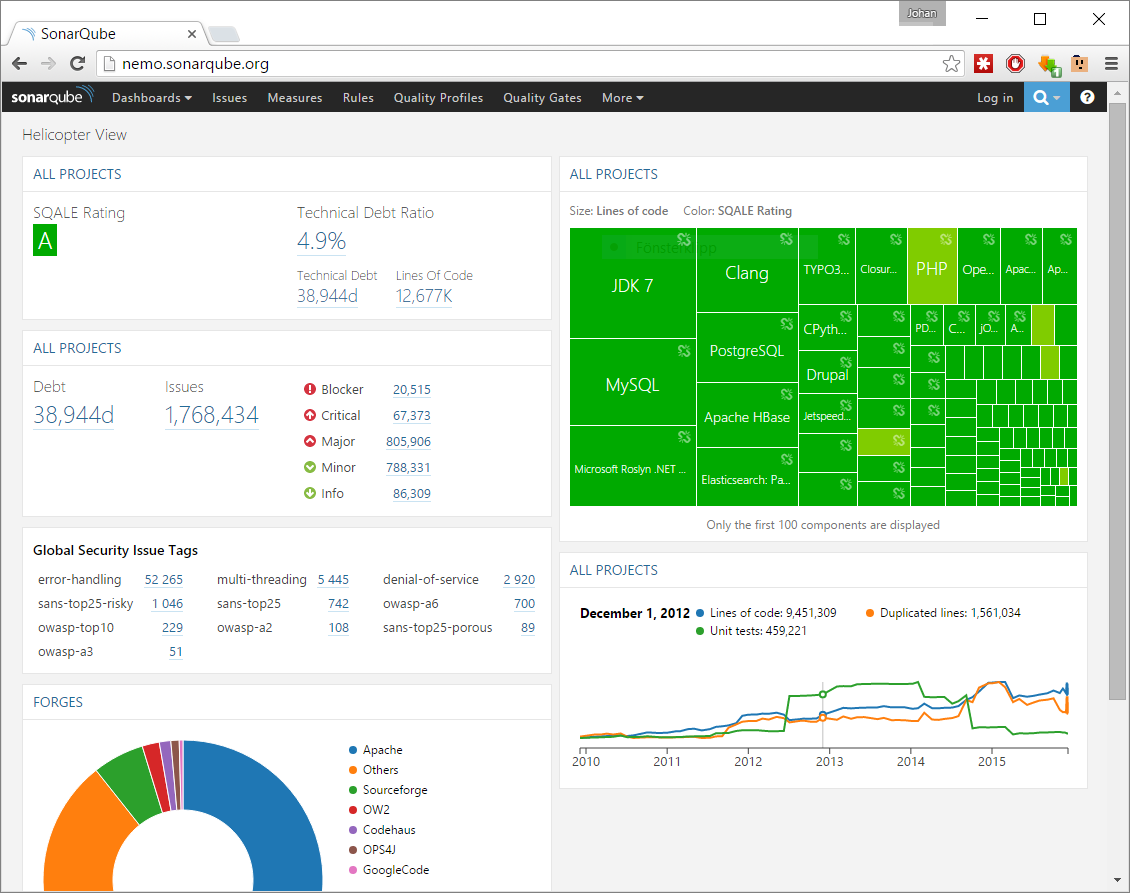
Introduction to SonarQube
SonarQube is a service that can perform different forms of analysis of your project. It can run code analysis for you, such as FxCop and their own SonarLint. If you need to, you can write custom rules (in XPath format for C#) for any special validation you need to make.
Information that is produced by a build, such as code coverage and unit test execution results, can be reported to SonarQube. Analysis of that can be made on the entire code base or just on new code. Either from last analysis, or from the last version of the software.
A great feature of SonarQube is that it can perform trend analysis of these project metrics. Metrics can be used both to visualize how the project has evolved over time, or to set a quality gate that code must pass before it is submitted. For example, SonarQube can be configured so that it is not ok if code coverage is lower than a certain value. It is wise to configure that threshold to be based on metrics from new or changed code since last analysis. This makes it easier to introduce such a rule midway in a project.
Another nice feature is that it is possible to see the project code with coverage highlighting. Not everyone care to run tests with coverage when they develop, and what is worse, not all have coverage software to begin with. Code coverage included in Visual Studio Enterprise, or can be added with third party add-ons such as dotCover, but typically cost money.
SonarQube is hosted as a Java application that is run inside a windows service. If you like, you can use the following powershell script to set up SonarQube on a fresh Windows Server 2012 R2.
Install the C# plugin under Administration - System - Update Center - Available.
Restart SonarQube service.
Wait for Java(TM) Platform SE binary-processes to stop using 100% CPU.
Create a new project under Administration - Projects - Management.
How to configure VSTS/TFS
Team Foundation Server (TFS) 2015 and Visual Studio Team Services (VSTS) comes with two build tasks for retrieving and sending data to a SonarQube service. In you have not got these tasks installed, you can get them at vso-agent-tasks.
If you use Team Foundation Version Control (TFVC), you can use gated builds to prevent bad quality check-ins.
Gated builds are not available if you use Git. In that case, use SonarQube to analyse your pull requests instead. There are plugins for GutHub and BitBucket that will do this for you. If you use VSTS/TFS there is no problem setting up the analysis as part of a pull request build.
If you have an old version of TFS, or have on-premise build agents, you need to install the SonarScanner manually. See the ALM Ranger Guidance pp 18-21 for instructions.
I think most of us are familiar with what NuGet is, and how it can be used to add packages from the official NuGet feed to our projects. We can all agree on that It is a real convenient way of sharing code.
What is strange is that I seldom find projects that use NuGet to share code within the project. Other more ad-hoc solutions are used instead. Have you ever opened a solution in Visual Studio to find that one of the projects that is listed in the solution is also included in an other solution? If you have, you might also have suffered from:
Missing dependent projects: If adding a project as a reference to another in one solution it is easy to forget adding the referenced project to all solutions where it is now needed.
Long relative paths which include the branch or repository name: This the just awful! No, I do not make this up. I have seen it happen more than once… Your project will no longer be able to build or use any branch strategy.
NuGet packages which will not restore on build: NuGet packages are restored to the packages folder. By default this folder is located where the solution file is. If a project has references to DLLs in a packages folder different than the packages folder of your current solution, you will not be able to build if you have to triggered a NuGet restore on that other solution beforehand.
Another (bad) solution to the problem of sharing code is to simply copy it to all locations where one needs it. This might seem easy, but it makes it very hard to manage future updates to the shared code.
My observation is that many, if not all, developers consume NuGet feeds (at least the official one), but surprisingly few produce their own.
Why You Should Share Code With Your Own NuGet Feeds
There are many reasons for not publishing packages directly to the official NuGet feed.
If you do not like your packages to be public, obviously.
It does not make sense to publish packages from your CI builds.
If you publish packages that does not work, you will get bad-will from people that get an opportunity to use them.
Once packages are published in the official feed, they cannot be deleted. To correct a mistake in a published package you have to publish a new one with a higher version instead.
A better solution is to use your own NuGet feed, where you have more control over which packages exist and who that can access them. Perhaps it does not even make sense to make a package available to everyone. But if it does, it is a good idea to only push it to the official NuGet feed once the package has been verified in your own feed first.
Feed Hosting Alternatives
There are many ways you can host a NuGet feed. You should use the one that seems like the best depending on your project needs.
NuGet supports two types of security. To prevent anyone from pushing packages to your feed you can set an API key, which is a simple password that will be required to provide in the push command. To prevent anyone from consuming your feed, NuGet relies on authentication. For the most part basic authentication is used, although single-sign on with active directory is also possible.
Of course, if you really want to, you can customize NuGet to also use authentication for pushing packages. For example, this would be the case if you only want users belonging to a special group to be able to contribute to a feed.
On Premise - File Share
A fast and easy way to get started is to simply put the packages in a folder which is shared within your project. NuGet calls this a Local Feed.
Good:
Everyone knows how to put files in a folder.
Bad:
File shares are typically not suited for public distribution.
If you use Visual Studio Team Services (VSTS), you have to configure an on premise build agent for access to the file share during builds.
File shares are cumbersome for employees to access when they are not at the office.
No download statistics.
Make care that no firewall rules prevent you or the build server from accessing the file share.
On Premise - ASP.NET Web Application
An alternative to using file shares for on premise hosting is to use an ASP.NET web application. If you need any special access policies or special requirements regarding handling of packages, this is the way to go.
If put on a computer with a public IP, the feed can be used for public distribution.
Fully customizable handling of NuGet packages.
Bad:
If the web application cannot be reached through internet, then it is cumbersome for employees to access it when they are not at the office.
If it is desired to secure online access, some authentication work needs to be put in to secure the feed.
No built in download statistics.
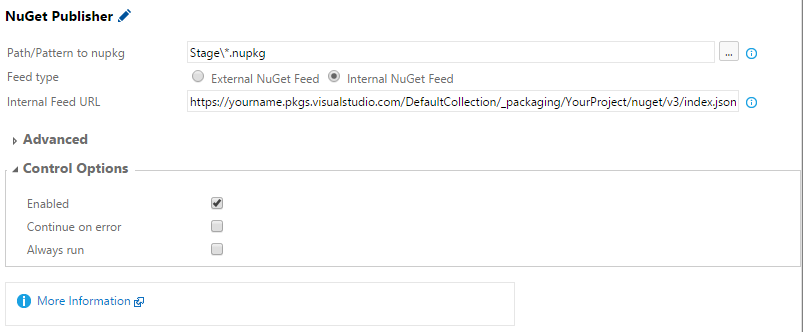
To access a NuGet feed in VSTS, you need to configure a generic endpoint with the url of the application and the API key as the password. To get a build to publish packages to the feed, use the NuGet Publisher task and select the generic endpoint.
If you use authentication, you need to put in the username and password into NuGet. To my knowledge, this is not supported yet by the built in NuGet tasks of VSTS. I have made a demo of how it could be done in my VSO Agent Tasks repository on GitHub. Look for NuGet Publisher With Credentials.
My guess is that Microsoft will eventually provide a special type of NuGet endpoint for this type of scenario.
Azure Free Webbapp - ASP.NET Web Application
Instead of putting the web application on premise, you can put it as a web application on Azure. Free web apps comes with up to 1GB of storage.
The procedure to publish an ASP.NET web application to Azure is straightforward. Make sure you have selected Azure publishing when you create the web application project, then simply right click the project and select publish.
Good:
Can be used for public distribution.
Fully customizable handling of NuGet packages.
Bad:
If desired, authentication work is needed for security.
No built in download statistics.
MyGet
MyGet offers an advanced service for NuGet feed hosting. Their free alternative gives 500 MB of storage for public feeds protected by one or many API keys. For a minor fee, you will get 1GB of storage and the possibility to secure your feeds with authentication.
Good:
Can be used for public distribution.
Advanced features like feed aggregation, feed synchronization, web hooks, policies for automatic deletion of old packages, etc.
Bad:
It will cost you some dollars each month to have a private feed.
MyGet feeds are accessed in VSTS with generic endpoints just like the ASP.NET web application.
MyGet supports a special way to add packages to a feed. By connecting a feed to a VSTS build, MyGet can search for any NuGet packages in the build artifacts and add the ones it find to your feed. This can be a convenient way to push packages to a private feed since you do not need to handle NuGet authentication credentials.
To add NuGet packages to the build artifacts in VSTS, use the built in Publish Build Artifacts task.
VSTS Package Feeds
Microsoft has just recently added a preview feature to VSTS called Package Management. It is free and offers unlimited storage. (Well? I have not found any listed storage quotas in their documentation. I assume its unlimited since they have not got any storage quota for source code.)
Because of the authentication model around VSTS, only private feeds are available.
A few days ago, Microsoft patched the NuGet Publisher task to support internal NuGet feeds. When VSTS is updated next time (my guess is that it will be in the middle of december) all accounts will get the updated version, but if you do not want to wait you can update it yourself.
For some time now, Community TFS Build Extensions has provided a PowerShell script for automatic versioning of assemblies during a build. This simple script served me well, until I heard about semantic versioning… To make a long story short, semantic versioning is a standard way to reason about version numbering.
There are quite a few version patterns that are in use, where Major.Minor.Patch.Build is a common one. This is however not a valid format according to the semantic versioning specification, although I suspect that many relates to that pattern when they talk about versioning.
The version patterns that NuGet supports are both Major.Minor.Patch and Major.Minor.Patch-Prerelease, see the versioning documentation of NuGet for more details.
Up until now I have struggled with setting prerelease versions for NuGet packages automatically during a build. My problem with the standard .Net assembly version, which was the version that I used to focus on, is that it does not support the prerelease pattern. Because of this, I used to include the NuGet package version either directly in the nuspec-file or as an input parameter for the build.
A couple of days ago I once again found myself in need of publishing a series of prerelease NuGet packages, and this time I found a way to make the versioning happen automatically. I discovered that .Net supports not only one, but three version types. I also found out how easy it is to create custom tools for the new build workflow in Visual Studio Team Services (VSTS) (Formerly Visual Studio Online) and TFS 2015.
Customizing the Build To Version Assemblies
VSTS and TFS 2015 bring a new build workflow with a set of predefined tools organized into build steps. Needless to say, although that these tools are great they do not cover all your customization scenarios of your build- or release flow. Invoking PowerShell scripts is often an appealing option for this kind of customization. Using PowerShell scripts is especially a good idea when you are making changes that are unique for your solution. Just write your script and invoke it!
Working with builds that directly invokes PowerShell scripts has its limitations:
If you have to deal with multiple arguments it is easy to get one of them wrong.
Often when you update a PowerShell script you will affect its signature, and you might have to manually update its calling command at many places.
Each build have to include the PowerShell script-files in its source code.
Fortunately, it is relatively straightforward to package your scripts in a task of your own. Once such a task is installed, it can be used by all builds in the entire collection.
How to Create a New Task
I have not found any official documentation on how to create new tasks, but the ones that are included in VSTS/TFS 2015 by default are available as open source from Microsofts GitHub account. A pragmatic approach for your first homebrewed task could be to copy an existing one and customize it to your needs. Just do not forget to generate a new ID!
The minimum task should include task.json, icon.png/svg and any files that need to be invoked. The backend (build agents, which can be installed on both Windows and Linux) can handle running Node-, PowerShell-, and Bash scripts as well as invoking a process directly.
Installation of Tasks
The TFS Cross Platform Command Line utility (tfx-cli) is used to install tasks. It is built on Node.js, so if you have not already got Node.js you have to install it. One way to do that it is to use the Chocolatey command cinst nodejs.
Then, to install a task run the following commands in a Node.js command prompt:
npm install -g tfx-cli - This installs the tfx-cli tool.
tfx login - The login is reused throughout the entire session.
Enter collection url > https://yourname.visualstudio.com/DefaultCollection
If you change your mind and do not want a task anymore, you can remove it withtfx build tasks delete b8df3d76-4ee4-45a9-a659-6ead63b536b4, where the Guid is easiest found in the task.json of your task.
If you make a change to a task that you have previously uploaded, you have to bump its version before you upload it again. The server does not allow overwriting the content of an existing version.
Describing the Apply Semantic Versioning to Assemblies Build Task
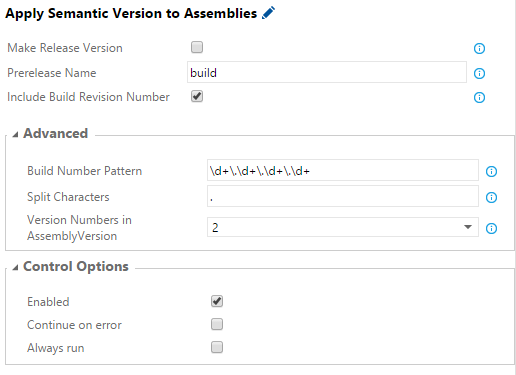
The solution to my NuGet package versioning problem was to use the build number to set the versions, and to configure the prerelease name in a build task. To make meaningful semantic versions of all three version types of .Net, they are set to different values. I have published the Apply Semantic Versioning to Assemblies task in my VSO-Agent-Tasks GitHub repository so you can make use of it.
Added as a step in a build, this is how it looks.
The Three Assembly Versions Supported by .Net
The AssemblyVersion is the number that is used by a dll to point out a reference to a specific version of another dll. If this version is changed in a newer dll, those references needs to be updated to target that dll instead. If you follow semantic versioning, the first two version numbers are the ones to increase when the public API changes. Therefore it is a good idea to include just those in the assembly version.
The AssemblyFileVersion is not used by .Net directly, but is instead of value as a historical reference. If you would ever try to figure out from what build a dll has come from, then the assembly file version would help you answer that.
The AssemblyInformationalVersion is something human-readable that describes a version, for example 1.0-RC1. This can theoretically be whatever text you prefer, but in this task it is only configurable to the format 1.2.3-abc0004. Note that the build number is left padded with zeros. The reason for this is that NuGet sorts prerelease versions alphabetically. Semantic versioning supports Major.Minor.Patch-Prerelease.Build, but NuGet does not.
A great thing about the AssemblyInformationalVersion is that NuGet will use that for the package version if it is present. Problem solved!
How Does It Work?
By use of a regular expression, exactly four version numbers (for example 1.2.3.4) are extracted from the build number. All AssemblyInfo.cs files are then iterated and versions are set in the following attributes:
AssemblyVersion - Is set to either 1, 1.2, 1.2.3 or 1.2.3.4 depending on what you enter under “Version Numbers in AssemblyVersion-attribute”. 1.2 is the default.
AssemblyFileVersion - Is set to 1.2.3.4. This is not configurable.
AssemblyInformationalVersion - Is set to either 1.2.3, 1.2.3-abc or 1.2.3-abc0004 depending on what you enter under “Make Release Version”, “Prerelease Name” and “Include Build Revision Number”.
When one of these attributes are present in the AssemblyInfo.cs-file, their entered version-string is replaced. Attributes which are not present are instead added at the end of the file.
As you well understand, this task must be placed before the build task to make any difference.
Practical Use
The informational version format 1.2.3-abc0004, which is compatible with NuGet, can be used to represent prerelease packages from your nightly builds. For example 2.1.3-build0421 could be the semantic version for 421st build targeting the fourth bugfix of the second API update of the 2.0 release.
When packing a project package and to have NuGet use the informational version number, just set the version tag to <version>$version$</version> in the nuspec-file and you are good to go.
When you are planning to make a new release, you might find that it is a good idea to have the version numbers you intend to have on release fixed and let the build revision number update until you are done. If this is the case, use $(BuildDefinitionName).2.1.3$(Rev:.r) as the Build number format for the build. When you think that you are done, you can simply tick “Make Release Version” and build to make a release version which in this case would be 2.1.3. If you would like to build a release candidate, untick “Include Build Revision Number” and replace the “Prerelease Name” to for example RC1 which would result in 2.1.3-RC1.
Advanced Options
You can change the Build Number Pattern that is used to extract the version numbers from the build number. If you do, then make sure that you enter matching Split Characters and that there would still be exactly four versions present.
Other Tools to Consider
If you are using Git as version control, and do not mind some additional complexity, GitVersion is an excellent tool. It fetch the version from the branch name, branch relations, commit tags and commit messages. This method of finding the version is superior to fetching it from the build number since you do not have to regularly update the build number format as you make releases.
But it forces you to follow a specific branch- and pull request strategy (although I think it’s a good one) in your development process. Not everyone would like to do that.
An other option is to use the versioning capabilities of the built in NuGet Packager task. It contains an option to ?Use Build number to version package? which if checked sets a version to the NuGet package by an argument to the nuget.exe pack command. That version is extracted from the build number in a similar fashion as my Apply Semantic Versioning to Assemblies task does it, but in this case the version is fixed to be in the format Major.Minor.Patch.Build. Using this approach does not version the assemblies, nor does it support semantic versioning.
Git is a source control version system that encourages you to commit changes often. Since you have your own local repository it is not that important that everything that is committed is of premium quality. You can always amend, squach, reword, and even remove commits later before you make your changes public to your team.
Why you should commit often
It is actually a good practice to commit as soon as you get something right. Even the smallest change that works is best put into history. To commit often brings a few advantages that you would not have anyway:
You never need to worry that any changes (and even temporary such) are lost if you screw up.
If you try something out, and it shows that it does not work, you can reset the branch instead of changing back the code manually.
If you later on realize that a commit is not needed you can rebase and remove that commit from history.
If you fix something important that someone else in your team suddenly needs, then that person can cherry pick your commit instead of making the change manually.
? need I go on?
Git push only when you have something to share
Another good practice is that every branch that is public should only contain work that is complete, done, and if you will done-done. For example, one should at any time be able to do a pull request of that work and have it merged into master.
This makes it super easy for your team members to know what branches they can use to build features of their own upon. Obviously all public branches!
When using the distributed workflow that git allows, with lots of branches that are often merged all over the place, it?s easy to pick a wrong branch by mistake. The risk of that happening is lower if there are no junk cloading the things that are actually important.
In other words, invoke the git push only when you have something to share. And that something should be the kind that is worth sharing! Please keep your public repository tidy.
The fear of hardware failure
One disadvantage of having lots of changes on your local machine is that they can go up in smoke if your computer dies on you. Instead of pushing commits to your public repository you need to address this in another manner.
You could set up a remote repository and push your changes there to backup. But I would not recommend it. Having more than one remote really is a hazzle! Especially when doing it for backup reasons only.
One more direct way is to simply do regular copies of your local repositories to a remote location, say a network share, or why not OneDrive? You do not need to copy your checked out branch with binaries and what not. All that is needed is the .git folder.
PowerShell to the rescue
My approach is to schedule the following PowerShell to run once each hour. Problem solved!
gci $Source-Recurse-Filter".git"-Force-Directory | %{ $dir = Join-Path (Join-Path$target$_.Parent.Name) ".git" robocopy $_.FullName $dir /MIR | Out-Null if ($LASTEXITCODE-gt7) { Write-Error"RoboCopy exited with code $($LASTEXITCODE). Something bad happended when taking backup of $($_.Parent.FullName)!" } else { Write-Output"Mirrored content of $($_.FullName) to $dir" } }
For example, I invoke it by .\Backup-Git.ps1 -Source C:\Dev -Target C:\OneDrive\Backup\Git\Rusty.
I have many computers, and I keep a separate backup folder for each. (One of them is called Rusty?)
My dev folder contains lots of clones of other people’s repositories which I am not interested in backupping. If you make it a habit to remove their .git folders then they will not get mirrored to your backup destination.
You can surely think of something else that suites your workflow better! :)
We all agree on that doing code review is a good thing. But you need a natural way to conduct code reviews in your team workflow for them to happen. One such is to review all code before it’s pushed to the main branch. In a distributed version control system such as Git you can create a pull request to initiate such a review.
GitHub has long supported a nice graphical experience working with pull requests, and TFS and Visual Studio Online (VSO) have just recently caught up. With the release of TFS 2015, they are now in my opinion quite similar in functionally all of them.
What is of importance when reviewing someone else’s changes is, aside from being able to comment on them, to also to know if the build still pass if they are applied. Obviously, there is no use to start the review if the changes can’t be compiled. Nor if they break any automatic tests.
In this post I will use the same PowerShell repository as in my previous post. I will use VSO, but I could just as well have used TFS 2015. For the moment, they are identical with regards to pull request functionality.
Support for Pull Requests in TFS 2015, VSO and GitHub
If you have your automatic builds run by a build agent hosted in VSO for a Git repository which is also hosted in VSO, it is no surprise that it works out of the box.
But what about if you have your repository in GitHub? Triggering VSO builds for pull requests in a GitHub repository is something you can do, but there is no built in functionally for reporting the build results to the pull request. Not yet anyway.
If you have your code on GitHub, then moving the source code to VSO might be something that you are not prepared to do. If so, you can host your own build server. There exists plugins for both Jenkins and TeamCity for reporting build results to a pull request on GitHub.
When preparing this post, pushing the GitHub branches of my test repository to VSO was nothing I had any objections against. Pushing all branches to another remote host can be done with the following commands:
1
2
git remote add vso https://johanclasson.visualstudio.com/DefaultCollection/_git/PowerShell
git push -u vso --all
Configuring Automatic Building of Pull Requests
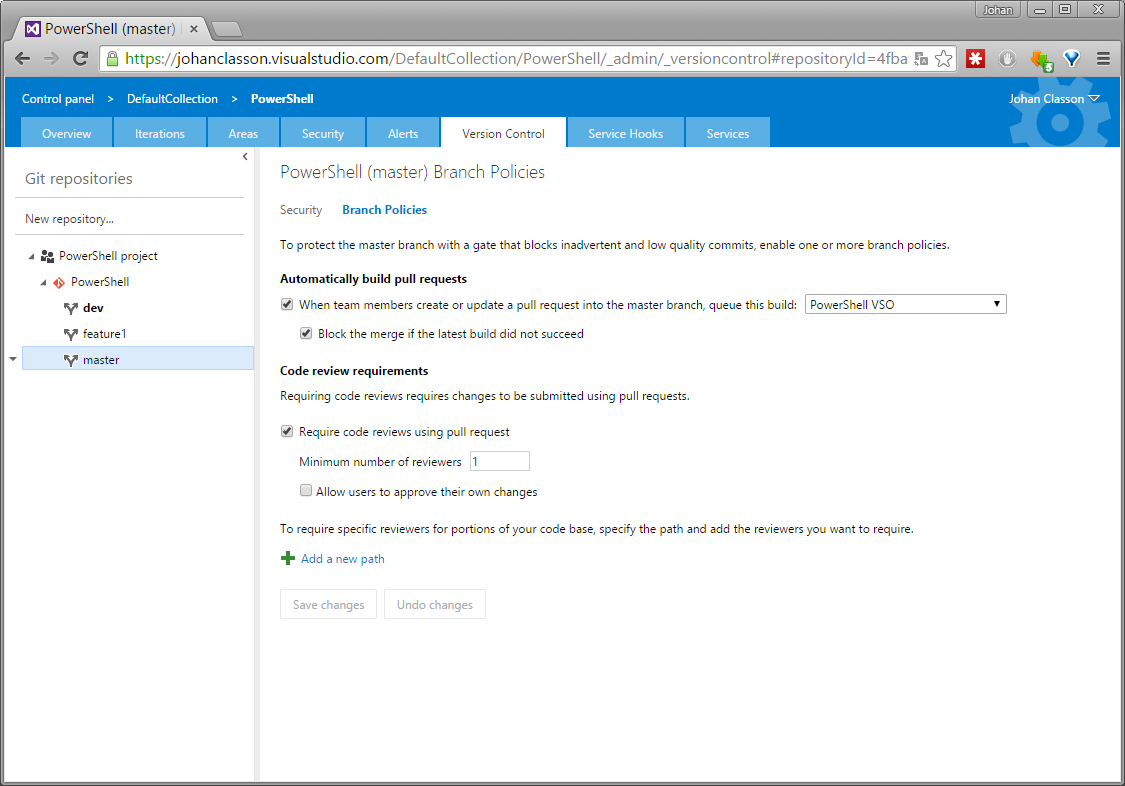
First create a build definition for your branch, if you have not already got one. Next head over to the team project settings page. Under the Version Control tab, you can set up something called branch policies.
Under Automatically build pull requests you can select the build definition that you want to be triggered.
Regarding pull requests in TFS 2015 and VSO, you can do some things which you can’t in GitHub. Under Code review requirements you can enforce that all commits to a branch have to be made through pull requests.
By default, the user who has made a pull request can’t approve it. If you really want this to be possible you can change this setting here as well.
With Add a new path you can require specific reviewers for portions of your code base. For example if you got sensitive files in a specific folder, you can be sure that pull requests that change files in that folder is reviewed by an expert in your team.
Working with Pull Requests
If you have read my previous post you know that in my test repository, several of the automatic tests failed. In a villainous attempt to fix this, I created a feature1 branch, and committed and pushed a change to it.
Create Pull Requests
Under the CODE - Pull Requests tab, you can either click New Pull Request in the top left, or the blue Create Pull Request quick button in the middle.
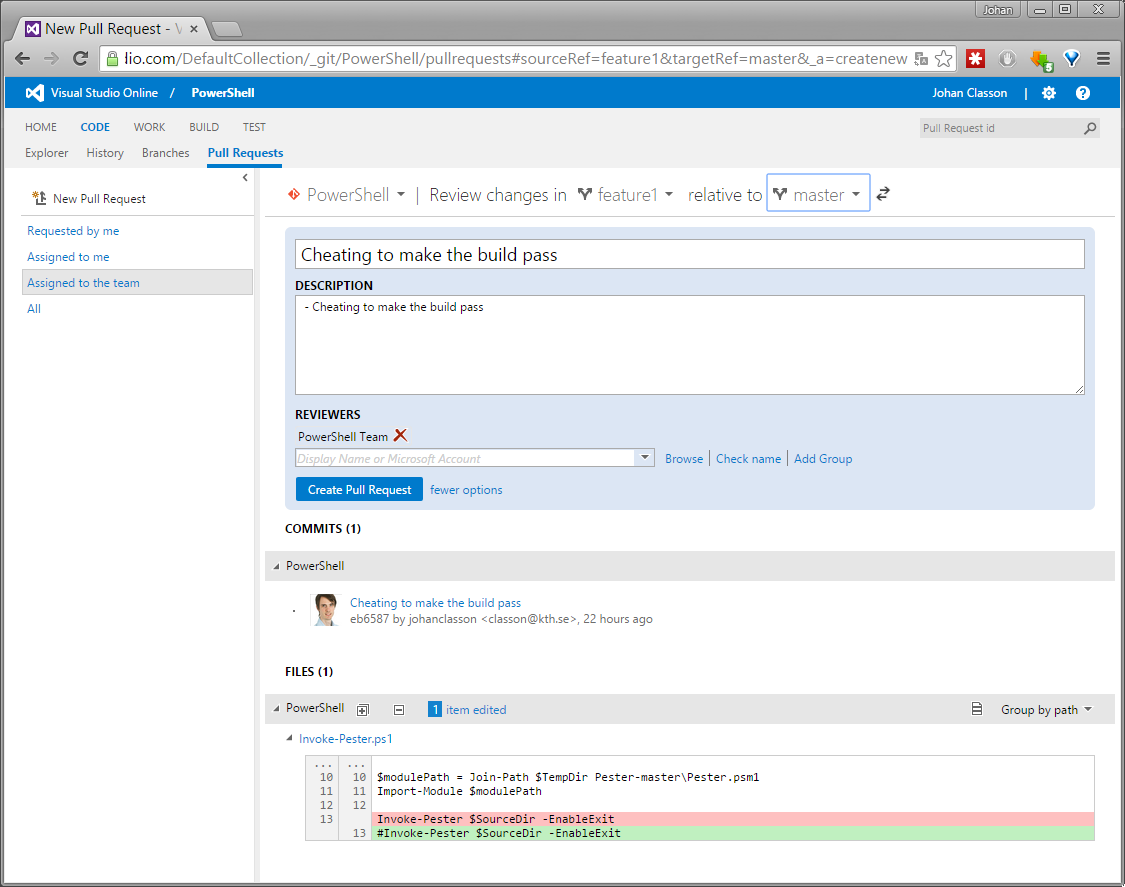
This opens a page where you can edit details of the pull request which it’s going to be created. Make sure that you select the correct target branch, next to relative to. The description field is prefilled with the commit comments from the source branch.
As you can see, I’ve cheated by commenting out the command to run the automatic tests. For sure, that would make no tests fail!
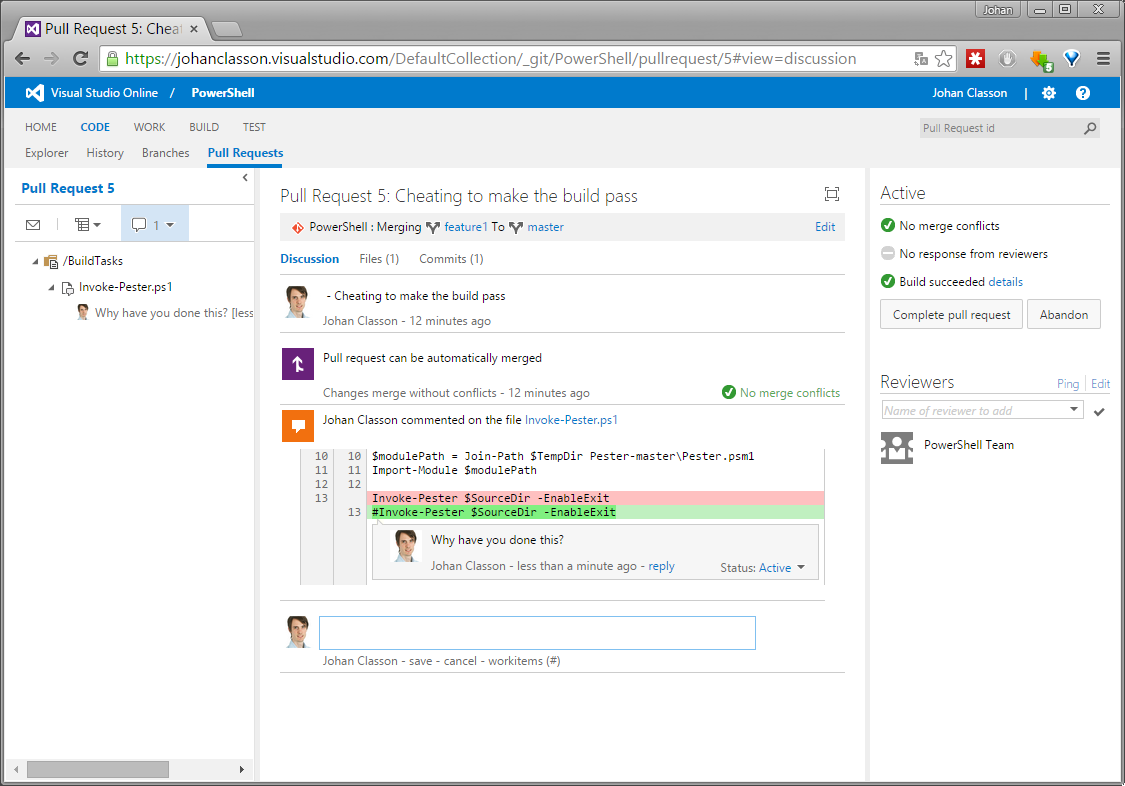
Review Pull Requests
Luckily some decent person is likely to review the pull request before it is merged. Under CODE - Pull Requests you can see active pull requests. Clicking the pull request will open it in review mode, looking like this:
There you can comment on source code lines and also place general comments. Note the Build succeeded badge in to top right, indicating that all is well. But in this case, if you inspect the details it will be obvious that no tests have been run.
One could click Complete pull request to accept- and have it merged to the main branch. Then it is a good idea to click Delete source branch to remove the branch, which probably will no longer be used.
But in this case one should click Abandon, and give the person who made the request a lesson in code ethics…
If you work with an open source project, or by other means want to share your project with unknown people, GitHub is a great place to store source code. It does not provide any support for building, versioning or deployment, so you have to set these things up somewhere else.
You can use either Team City, Jenkins or TFS 2015 to host your own build service without so much trouble. If you are not so keen on running your own machine, you can use an online service instead. One of those is Visual Studio Online (VSO), which is my favorite in this case since it’s build agent:
Can be used to build almost anything, and comes bundled with functionality for compiling .Net, Javascript, Ant, Maven, Android, Xamarin, Xcode, among others.
Is easy to customize for those special needs that you almost always have.
To demonstrate the ability for customization and doing something completely different in a build, I will use my PowerShell repository on GitHub as an example in this post.
Connecting VSO to GitHub
If you do not already have an account on visualstudio.com, create one now. Once logged in create a team project representing your GitHub repository.
In TFS a team project is a container where repositories, work items, source code, and builds are kept.
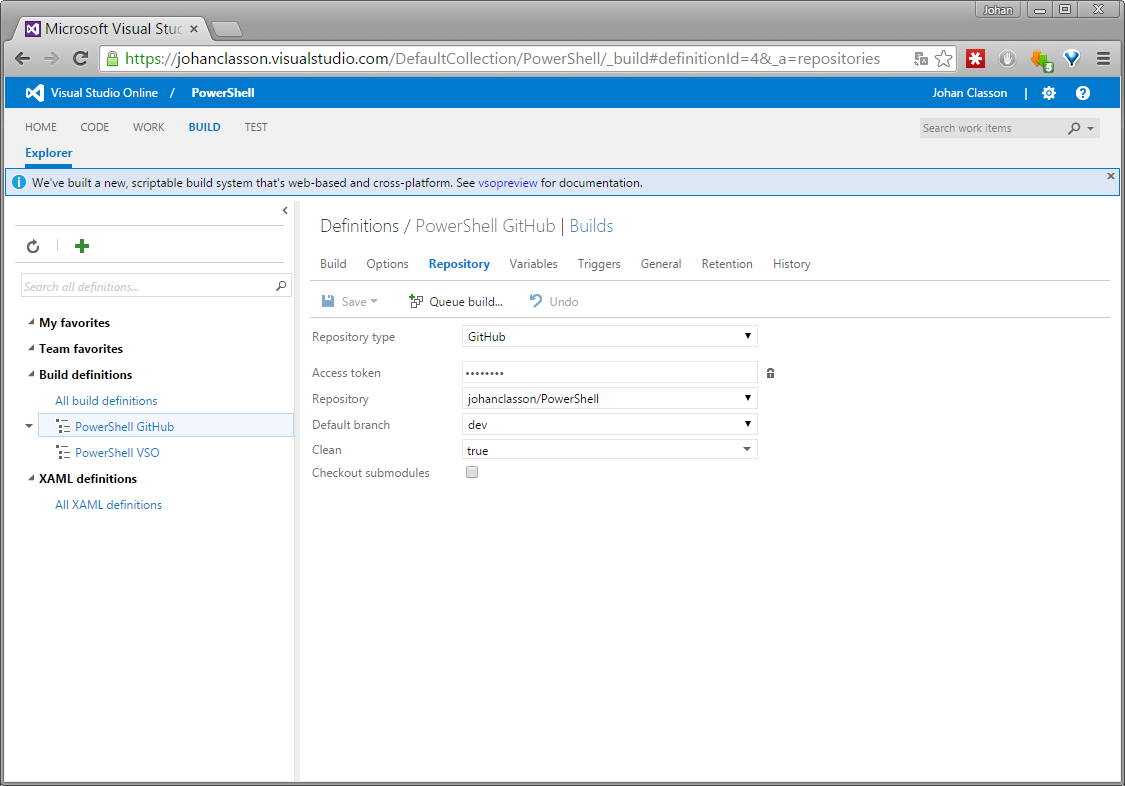
Head over to Builds and create a new build definition. Enter your connection details under the Repository tab.
Since I used a PowerShell repository as an example there is nothing to compile in the build, but the purpose is only to run a series of tests.
To my knowledge, the most used testing framework for PowerShell is Pester. The hosted build agents does not have the Pester module installed. So to be able to run the tests, Pester will first have to be installed. I have written a script for this, and which is explained in more detail later in this post.
What is performed by a build is configured under the build tab, by adding one of the available build steps. Running a series of Pester tests can be done by executing a PowerShell build step.
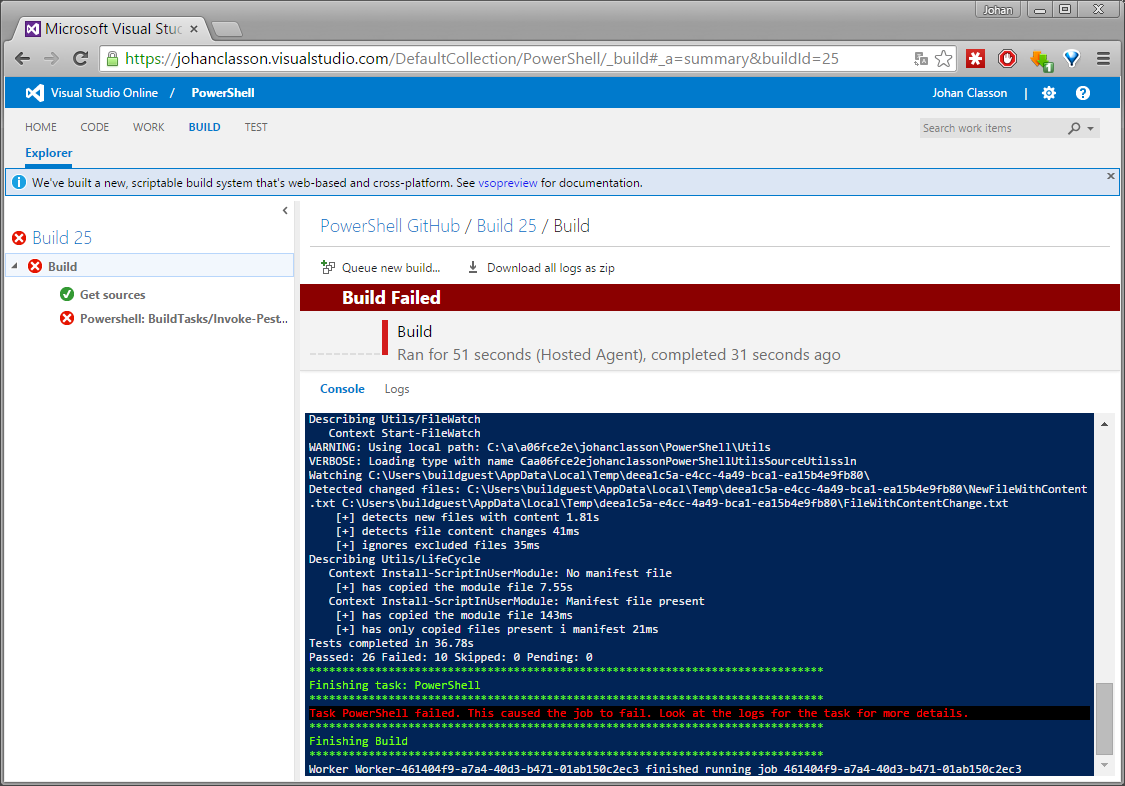
To have the build kick off automatically when changes are pushed to the Repository, configure the build with a Continuous Integration trigger. Use Filters to select what branches will trigger a build. But you can also build your GitHub repository with VSO manually by pressing the Queue build button.
As can be seen, the build failed because 10 tests failed.
This was actually the first time I executed the tests on another machine than my own. It turned out that some tests weren’t as independent as I thought. And some could not even execute on a Windows Core, which is the operating system used by the VSO hosted build agents.
Running tests automatically is a good idea, and in this case I learned the hard way that it’s best to start using an external build service from the very beginning. Even for a scripting language.
One of the modules in my PowerShell repository uses web scraping to get information from a web page, and if the layout changes to much it will no longer work. To alert me when it has broken it is convenient to schedule a build every night and set up an email alert for failed builds.
Build Badge
VSO and TFS 2015 provides a way for you to present a badge on a website to tell whether you build passes or not.
To enable this feature you can check the Badge enabled checkbox under the General tab of a build definition. When you save you will get an url to a SVG image.
Have you ever felt the need to have a test environment set up on your personal computer? Or perhaps to have an automated way to set up an environment in your Continuous Integration workflow? If it’s done manually, this is a tedious and I believe often error prone activity. But if it’s automated through for example my script demonstrated below, you can have your new virtual machines starting in just seconds.
I have made a PowerShell Module that contains a function that creates virtual-networks and computers in Hyper-V according to an XML-configuration. It’s idempotent enough so that it does not try to create something that is already there.
The reason that I choose Hyper-V as hypervisor is just that it’s something that is accessible for most people without any extra cost. But I believe that it should not be hard to make the module to work with another, for example Azure, if you prefer to have your environments there instead.
When developing, I prefer to have my virtual machines locally because it’s much faster. A Windows Server 2012 R2 Core instance will run with 512MB of RAM and requires about 6GB of disk space. This makes it not much of a deal to run several virtual machines even on an laptop.
In this post, I will use Windows as example since it’s the technology that I’m most familiar with. But this technique should work just as good with any other operating systems that run on Hyper-V.
Alternative Tool
Microsoft already has a similar tool called PowerShell Deployment Toolkit, primarily for deployment of System Center 2012. Instead of using it, I preferred to write my own because I wanted something more lightweight.
Setup Windows Server Templates
I prefer to work with Windows Server Core instances for two reasons. First, since they do not contain any GUI they consume less RAM and disk-space. And second, if you ever feel a need to RDP to a test server, I think it’s a sign that you have failed to fulfill Continuous Integration. Deployment of both applications and OS-configuration are done best with a tools like PowerShell DSC, Chef or Puppet. One should not have to log on to a server for deployment reasons.
To speed up creation of virtual machines one can create templates of already preconfigured instances of Windows. Then, you do not have to do the installation of the operating system manually, nor whatever other steps you normally do when creating a new virtual machine.
To create a template one should not just make a copy of an other virtual machine, but instead anonymize it first. You have to remove unique identifiers, such as for example SID and computer name. Microsoft provides a tool for this purpose called Sysprep. For details about what it removes, please see this blog post by Michael Pietroforte.
You can run Sysprep by double clicking its executive, or by invoking it through command line in the following manner.
After Sysprep has run on a computer, and when first booting it up you need to fill in some details such as locale, administrator account password and license key.
Automated Installation
Would it not be nice if one could create virtual machines from templates without having to enter any details? Yeah, Microsoft has thought of that. There’s this feature called answer files, which enter the settings for you. You can use answer files to automate normal installations of Windows, but they also work together with Syspreped images. One way of how to make Windows load an answer file is to place it in the folder C:\Windows\Panther\ with the name unattend.xml.
Once the bootup configuration is complete, the installer process removes sensible data (such as password and product key) from that file by replacing them with *SENSITIVE*DATA*DELETED*.
There’s an official tool from Microsoft for creating answer files which is named Windows System Image Manager (SIM), and it’s part of the Windows Assessment and Deployment Kit. Personally, I think that this application is a mess. It’s way to complicated to make me even want to try to use it.
The site Windows Answer File Generator comes to rescue. From there you can generate answer files for all Windows operating systems, but with the limitation that it does not offer the same flexibility as Windows SIM. For example, it can not add instructions for automatically joining a domain.
In the answer file I used preparing this post, I inserted underscore tokens in place of some fields. The function in the PowerShell Module replace them when creating virtual machines from that template.
To create the unattend.xml file on your template VHDX you can mount it with PowerShell, for example in the following way.
When creating your template, instead of installing the operating system and runing Sysprep manually you can use a tool. I have found the TechNet Scriptcenter Convert-WindowsImage.ps1 which can create sysprepped VHDX images from .iso-files.
I find this script to be too massive to use, and instead prefer to do the template myself. Creating templates is not something that I do often, so I do not have so much to gain from automating that activity.
Invoking the Hyper-V Environment Templating Function
To run the PowerShell function which creates the virtual machines you can either install the module, or just copy the .ps1-file and run it as a script.
A PowerShell Module is to some extent some functions that someone has packaged together. PowerShell monitors the folders in the environment variable PSModulePath for modules, and automatically imports them right when they you need them.
If you choose to install it as a module you have to rename the .ps1-files to .psm1, or you can follow the instructions in my PowerShell Repo Readme under Getting started. I prefer to have my module scripts as .ps1-files when I develop them. Once I decide to install a new version of a module, I have them renamed in the install process.
To invoke the Hyper-V Environment Templating function, type New-VMFromConfig -Path C:\PathTo\MyConfig.xml. I you like you can use the -Config parameter instead and pass in an [xml] object.
<Config> <VMSwitches> <InternalVMSwitchname="LocalComputer"dns="10.0.0.1"ip="10.0.0.2" /> <ExternalVMSwitchname="ExternalEthernet"netAdapterName="Ethernet" /> <!-- I did not bother to handle private network switches since I never use them. --> </VMSwitches> <VMsroot="C:\Hyper-V"> <!-- Example 1: Create VM from Template --> <VMname="Dev-Frontend"switches="LocalComputer,ExternalEthernet" startupBytes="512MB"dynamicMemory="false"processorCount="4"> <MoveVhdpath="C:\Hyper-V\Templates\Copies\win2012r2*.vhdx"> <ReplaceContentpathRelativeRoot="Windows\Panther\unattend.xml"> <addkey="__Locale__"value="041d:0000041d" /> <addkey="__TimeZone__"value="W. Europe Standard Time" /> <addkey="__ComputerName__"value="Frontend" /> <addkey="__ProductKey__"value="AAAAA-BBBBB-CCCCC-DDDDD-EEEEE" /> <addkey="__Password__"value="p@ssw0rd" /> </ReplaceContent> </MoveVhd> </VM> <!-- Example 2: Create VM with dvd and new disk --> <VMname="Dev-Backend"switches="LocalComputer"> <DvdDrivepath="C:\iso\dvd.iso" /> <Vhdsize="120GB" /> </VM> </VMs> </Config>
New virtual machines are created under the <VMs> root attribute in a folder that matches the name of the virtual machine.
The supported VHD tags are <MoveVhd path="...">, <CopyVhd path="...">, <DvdDrive path="...">, and <Vhd size="...">. The latter will create a new disk of the specified size. All three VHD tags can have a filename attribute which if set, specifies the name of the VHD file in the virtual machine folder.
Both the <CopyVhd> and <MoveVhd> supports the <ReplaceContent> tag which makes the answer file underscore token update possible. An advantage of moving a template VHD over copying it, is that it’s faster. The downside is that the template VHDs will no longer be available for future use. But if you create copies of your template VHD in advance you can overcome this. Since the VHD size of a clean install of Windows Server 2012 R2 Core is so small, space should not be an issue.
The <MoveVhd> path attribute supports wildcard matching. It picks the first file that matches the expression.
Tricks and Tweaks
Installing Windows Server 2012 R2 AD, DNS and DHCP
Name resolution and IP address distribution in Hyper-V is poor without a dedicated DNS and DHCP within the network. If you run your virtual machines on an external network, all is fine. But if you use internal or private networks you have to host these services yourself. Your would normally also need to connect to an Active Directory.
To solve these problems all in one you can configure an instance of Windows Server 2012 R2 to act as both AD, DNS and DHCP-server.
# AD Install-WindowsFeature AD-Domain-Services -IncludeManagementTools Install-ADDSForest -DomainName classon.eu
# DHCP (granted that the name of the computer is DC01) Install-WindowsFeature DHCP -IncludeManagementTools Add-DhcpServerv4Scope -name "My Scope" -StartRange 10.0.0.100 -EndRange 10.0.0.200 -SubnetMask 255.255.255.0 Set-DhcpServerv4OptionValue -DnsDomain classon.eu -DnsServer 10.0.0.1 Add-DhcpServerInDC -DnsName dc01.classon.eu
The PowerShell command to join a client machine to a domain is:
1 2
# Execute on the client machine Add-Computer -DomainName classon.eu -Restart
Switching Between GUI and No GUI in Windows Server
Sometimes it will be a pain to try to configure something that you know is easy if you have a GUI, but which isn’t when you are on a Windows Server Core instance. In those cases you can use Install-WindowsFeature to install the GUI, just to make your configuration, and then uninstall it again with Uninstall-WindowsFeature when you’re done.
If you invoke the Get-WindowsFeature on a Core instance, you will find the GUI related features looking like this:
1 2 3 4 5 6
Display Name Name Install State ------------ ---- ------------- [X] User Interfaces and Infrastructure User-Interfaces-Infra Installed [ ] Graphical Management Tools and Infrastructure Server-Gui-Mgmt-Infra Removed [ ] Desktop Experience Desktop-Experience Removed [ ] Server Graphical Shell Server-Gui-Shell Removed
And if invoked on a full installation, they look like this:
1 2 3 4 5 6
Display Name                                            Name                       Install State
------------                                            ----                       -------------
[X] User Interfaces and Infrastructure                  User-Interfaces-Infra          Installed
    [X] Graphical Management Tools and Infrastructure   Server-Gui-Mgmt-Infra          Installed
    [ ] Desktop Experience                              Desktop-Experience             Available
    [X] Server Graphical Shell                          Server-Gui-Shell               Installed
If a Windows Feature is Available, or Removed and you have got access to the internet, then you can install it without having any installation media. If that is not the case, you have to insert the .iso-file with the same version of the operating system in the DVD drive and specify the Source parameter. Follow these instructions for guidance.
Setting up PowerShell Remoting
When you deal with servers that has not got the features Server-Gui-Shell or Server-Gui-Mgmt-Infra activated, I think that it’s cumbersome to use remote desktop or the Hyper-V Virtual Machine Connection to connect to them. A more elegant solution is to use PowerShell Remoting, although it can be a bit hard to configure when not connected to a domain, such as in a workspace environment or when your try to connect to a machine from outside a domain. When connecting to a domain in an virtual isolated network from your host machine this will essentially be the case.
To get PowerShell Remoting to work on my Windows 8.1 laptop, I had to run the following commands:
Depending on the network confirmation of your host computer, you might not need the -SkipNetworkProfileCheck parameter.
Setting up Name Resolution to Work with Virtual Network
To make name resolution between your host and virtual machines to work, they need to be on the same subnet. Network Discovery is by default rejected by the windows firewall. You can enable it with the PowerShell command Enable-NetFirewallRule NETDIS-NB_Name-In-UDP.
I like to have my machines answering to Ping. When you are already at it, enable the firewall rule FPS-ICMP4-ERQ-In as well.
If you set the DNS address of the network adapter to be that of the DNS server, you can use the DNS server for name resolution. But since your host machine is outside the domain, you have to use the complete domain address. For example, frontend.classon.eu.
Also, PowerShell Remoting will not work if the IP address of the host is on another subnet than of the virtual machines.
Future Improvement
It would be nice to be able to have virtual machines being able to automatically join a domain.
For this to be possible, I have to solve two problems. First, I have to update the answer file to also include instructions for how to join a domain. Either I have to click through the Windows SIM application, or find someone else that has managed to do it and copy some lines from their xml-file. TechNet has some sample answer files for older operating systems that seams interesting. Hopefully they will also work for Windows Server 2012 R2.
Second, I need to make a PowerShell function that can start virtual machines. When creating a new environment with network isolation there is obviously no domain controller already present. Hence there might be an error if they start simultaneously. The function can solve this by waiting for any DCs to boot up before it starts any other virtual machines.
As an alternative to using answer files for domain joining, I might consider to use PowerShell instead. What I have in mind is to wait for a DC to start up, and then invoking the domain join on the client machines through a remoting session.
I will try to address this in a blog post sometime in the future.
Att göra certifieringstest för Microsoft via tredjepartsleverantörer är krångligt. Särskilt när man bor i en lite mindre stad, så som exempelvis Örebro. Visserligen har vi nyligen fått ett Addskills Testcenter här, men det erbjuder bara att skriva certifieringstest en gång i månaden.
När Microsoft bytte leverantör av certifieringstest från Prometric till Pearson VUE erbjuds ett nytt sätt att göra proven, nämligen via så kallade Online Proctored Exams. Även om det är lite krångel med att få igång det tekniska är det värt att överväga att göra sina examen på det här sättet. Och då inte bara på grund av förenklad logistik. Kostnaden för ett certifieringstest via Addskills är beroende på ort mellan 2 000 - 3 000 SEK. Gör man det via ett Online Proctored Exam kostar det istället 125 EUR.
Hur bokar man certifieringstest för Microsoft?
För att boka sitt provtillfälle går man in på Microsoft Learning (en-us). Notera att länken går till den amerikanska varianten. Märkligt nog så kommer man till en felsida om man använder Microsoft Learning. Det har varit så här i alla fall under senaste månaden. Gissningsvis så är det en regional sida för besökare från Sverige som är trasig.
Väl där klickar du på Register for exam, och följer guiden för att göra certifieringstestet som ett Online Proctored Exam.
Notera adressuppgifterna som du anger under bokningen. Om du blir tvungen att ringa supporten kommer du behöva uppge dessa för att kunna styrka din identitet.
Hur gör man?
Programvaran för certifieringstestet installerar du genom att göra System Test 1 på Pearson VUEs Microsoft-sida. Där finns även information om regler och teknikaliteter som rör testet.
Under själva tillfället blir man övervakad via webbkamera och mikrofon. Innan så ombeds man filma runt i rummet så att det inte finns några fusklappar eller dylikt. Av den här anledningen är det smidigt att ha en extern webbkamera så att det är lättare att filma i olika vinklar. Att bära runt en bärbar dator fungerar, men är lite klumpigt. Särskilt om man, som Pearson VUE rekommenderar, använder ethernet-sladd istället för WIFI.
Man måste också visa upp legitimation för kontrollanten. Denne behöver kunna läsa av giltighetstiden utan att bilden är suddig. Därför behöver man ha en webbkamera med relativt kort fokusavstånd. Vanligtvis är det bara webbkameror med autofokus som klarar av detta.
Jag rekommenderar Microsoft LifeCam Studio. Runt 600kr för en webbkamera kan verka överdrivet, men den är faktiskt värd varenda krona. Dessutom behöver man inte installera några drivrutiner manuellt för att använda den här kameran. Det är bara att plugga in och köra!
Hur startar man själva testet?
På Microsoft Learning Dashboard kan man starta ett inbokat certifieringstest via länken Start a previously scheduled online proctored exam.
Innan du börjar testet är det är lämpligt att kontrollera att webbkameran och mikrofonen fungerar, samt att stänga ner övriga program på din dator så som exempelvis Skype och Outlook. Pearson VUE vill även att man temporärt ska stänga av sitt antivirusprogram.
Värt att notera är att tiden som är angiven för provtillfället är i CET eller CEST vilket lyckligtvis är ekvivalent med Svensk tid.
I samband med att programvaran för certifieringstestet installeras så läggs en genväg med namn PVproctor på skrivbordet. Observera att du inte ska använda denna. Om du startar programmet via genvägen så blir du promptad att mata in en niosiffrig accesskod. Kruxet är att du inte har tillgång till någon sådan. För att starta testet är man tvungen att göra det via hemsidan.