Avoid Connection String Transforms With SQL Client Alias

Your reality as a programmer if often that the application that you and your team are writing is going to be run on a number of test- and production environments. The normal case is that these contain computers with different names and/or DNS addresses.

This means that your application configuration needs to be different on each and every environment. There exists a bunch of tools to solve this problem, and it is usually done with transformation of configuration files. Ouch!

Now, can you imagine a world where transformations of configuration files are not needed? At least not due to different addresses to the database server.

SQL Native Client Alias

A feature of SQL Server is that its clients can use aliases for database instances. You can call an alias whatever you want, and it can be run over either TCP or Named Pipes. This is not a miracle per se, since similar functionality can be achieved with help of a DNS-server, or why not an entry in the Windows host file.

What a SQL Client Alias can do that none other can, is to point out a named database instance on a target computer. But most importantly, configuring an alias does not require any out of the ordinary access rights (administrative rights to be precise). Developers does not typically have access to tamper with the company DNS server, and are usually too lazy to install their own…

Something that is a bit troublesome with SQL Client Aliases is that there exists 32- and 64-bit versions. It would have been reasonable that they shared the same list of configured aliases, but they do not. If you have both types of applications, you have to configure your alias twice.

Configuring with SQL Server Configuration Manager

To be able to connect to a SQL Server through an alias, the server needs to enable access over either Named Pipes or TCP/IP. This can be done by fiddling in SQL Server Configuration Manager, followed by a restart of the SQL Server service.

Enable SQL Server Protocols

Then to create a new alias, enter it under one of the nodes named SQL Native Client 11.0 Configuration, like so.

Set SQL Client Alias With SSCM

The good part with this method of configuring an alias is that you will probably be able to remember how to start SQL Server Configuration Manager, but the bad part is that it will only be available on a computer that has the features Client Components and Management Tools of SQL Server installed.

Having SQL Server installed on your development machine is fine, but what if you do not want to install it on environment client machines?

Configuring with cliconfg.exe

Since Windows 2000-isch, an application called cliconfig.exe has come bundled with Windows which can be used to configure SQL Client Aliases. Nice! Sounds promising.

You can start it by running cliconfig.exe from the Run Dialog, since it is already included in PATH. Wait… If only it was that easy. You need to be aware of that when run like this on a 32-bit OS, the 32-bit cliconfig.exe will be run. Naturally on a 64-bit OS, the 64-bit version will be run. You must consider which version your applications actually require and start the same version of cliconfig.exe.

Set SQL Client Alias With cliconfig.exe

To start a specific version, please use the following paths (no, they are not mixed up):

  • 32-bit, C:\windows\syswow64\cliconfg.exe
  • 64-bit, C:\windows\system32\cliconfg.exe

Ouch again! To have to configure both 32- and 64-bit aliases is a pain, is there no better way to do this?

PowerShell to the rescue

Luckily, configured aliases are stored in the Windows registry. Therefore it is possible to automate the task of setting up SQL Client Alias with PowerShell.

An example of how this can be done:

1
2
3
4
5
6
7
8
9
10
11
12
13
14
15
16
17
18
19
20
21
22
23
24
25
26
function Set-SqlClientAlias {
param(
[Parameter(Position=0, Mandatory=$true)]
[string]$Alias,
[Parameter(Position=1, Mandatory=$true)]
[string]$Instance,
[Parameter(Position=2, Mandatory=$false)]
[int]$Port = -1
)
function Set-RegistryValue([string]$Path, [string]$Name, [string]$Value) {
if (-not (Test-Path $Path)) {
New-Item $Path | Out-Null
}
New-ItemProperty -Path $Path -Name $Name -PropertyType String -Value $Value -Force | Out-Null
}

$x86Path = "HKLM:\Software\Microsoft\MSSQLServer\Client\ConnectTo"
$x64Path = "HKLM:\Software\Wow6432Node\Microsoft\MSSQLServer\Client\ConnectTo"
$Value = "DBMSSOCN,$Instance" # DBMSSOCN => TCP/IP
if ($Port -ne -1) {
$Value += ",$Port"
}

Set-RegistryValue -Path $x86Path -Name $Alias -Value $Value
Set-RegistryValue -Path $x64Path -Name $Alias -Value $Value
}

I have intentionally left out the ability to use the Named Pipe protocol since I think it is not of much use in this case. Databases are often run on dedicated servers, so your application cannot talk to them with pipes anyway. If you really want to use Named Pipes anyway the registry item value should look something like DBNMPNTW,\\myserver\pipe\sql\query.

I wish you a pleasant configuration experience! :)

Hidden Capabilities of PowerShell ISE IntelliSense

I do not program in PowerShell daily, but at least once or twice a week. Even though I am far from an expert on the matter, I would like to think of myself as a guy that knows the available commands.

Normally I have used the PowerShell ISE that comes bundled with Windows Management Framework to edit my scripts. As of late I have been looking around for another IDE, but have not found any that I feel lives up to my expectations.

I have come to realize that of the capabilities that I value the most, code completion (or ?IntelliSense? as Microsoft calls it) is the most important. When I know the syntax it is relieving to know that what I write is correctly spelled. When I do not know, it is convenient to not have to spam the command prompt with the Get-Command and Get-Member cmdlets.

Powershell ISE is frankly a quite crappy text editor, but I think it has the best code completion of all PowerShell editors out there. That feature alone makes it a winner.

How it use PowerShell ISE IntelliSense

The IntelliSense menu is often invoked automatically when you write. But if you for example accidently close it, you can get it back by hitting Ctrl + Space.

An example of Powershell IntelliSense

What also works is hitting tab to complete the word to the top suggestion of what is in the IntelliSense list. If it is not what you want you can continue hitting tab to cycle through the suggestions.

This works on cmdlets, paths, variables, properties and classes of .Net instances, DSC-configuration, and what not. I bet that every PowerShell developer out there are aware. But what at least I did not know of until today is the following two.

Command history

If you write # followed by Ctrl + Space you get a list of the latest commands which were run in the console.

Command History with Powershell IntelliSense

This is ideal for inserting commands in your script that you have tested out in the console first. Or when writing commands in the console, you can get the history by other means than hitting the arrow keys repeatedly.

Completion of type namespace

As a .Net developer I am used to be able to include all types in a namespace of a resource with the using-statement. Unfortunately, there exist no equivalent in PowerShell. This was a real PITA. At least for me, up until today.

Powershell IntelliSense can type out the namespace of a type for you. Simply write the class name followed by Ctrl + Space and magic happens.

Type Namespace Completion with PowerShell

In this case [messagebox will be expanded to [System.Windows.Forms.MessageBox. Not that I actually would like to use a WinForms message box in a PowerShell script, but this is just a stupid example.

To use this functionality with class libraries you have written yourself you need to first import them with either Add-Type or [System.Reflection.Assembly]::Load*-methods.

I thought this was absolutely thrilling, and I hope you will find it interesting at least! :)

WCF Service Hosting Made Easy

I often hear that WCF is hard to work with because it needs so much configuration. That might have been true in .Net 3.5, but since .Net 4.0 <serviceActivations> has been around to make our lives easier. Today, .Net 4.0 is not far from the Stone Age… So I am surprised that this is still an issue.

To get started simply:

  1. Create empty ASP.Net Web Application
  2. Add reference to System.ServiceModel.dll
  3. Add the <system.serviceModel> tag from the snippet below in your Web.config
1
2
3
4
5
6
7
8
9
10
11
12
13
14
15
16
17
<?xml version="1.0" encoding="utf-8"?>
<configuration>
<system.serviceModel>
<protocolMapping>
<clear />
<add scheme="net.pipe" binding="netNamedPipeBinding" />
<add scheme="net.tcp" binding="netTcpBinding" />
<add scheme="http" binding="basicHttpBinding" />
</protocolMapping>
<serviceHostingEnvironment>
<serviceActivations>
<add service="Example.Wcf.MyService" relativeAddress="./myservice.svc"
factory="System.ServiceModel.Activation.ServiceHostFactory" />
</serviceActivations>
</serviceHostingEnvironment>
</system.serviceModel>
</configuration>

You now have a convenient way to host WCF services by adding references to all Class Libraries that contain your service implementations. To get the Service Hosting Environment to pick up your services, all you have to do is to point them out with an extra <add /> under <serviceActivations>.

This approach has a number of advantages:

  • The hosting code is close to zero, which makes it easy to reach 100% code coverage through unit testing.
  • All services automatically gets endpoints over many protocols, which makes the information flow in your application more configurable.
  • In addition to the service implementation, there is no need for metadata files just to make hosting possible.

Below is an example of a service implementation.

1
2
3
4
5
6
7
8
9
10
11
12
13
14
15
16
17
18
19
20
using System;
using System.ServiceModel;

namespace Example.Wcf
{
[ServiceContract]
public interface IMyService
{
[OperationContract]
int Add(int x, int y);
}

public class MyService : IMyService
{
public int Add(int x, int y)
{
return x + y;
}
}
}

IoC

To make it easier to test the services that I write, I often use IoC containers of some sort to handle dependency resolution. The default ServiceHostFactory does not let you configure the container.

To do this with Unity you can replace the factory with a UnityServiceHostFactory, which can be found in the NuGet-package Unity.Wcf.

Client Proxies

Please do not use WCF clients generated with Add ? Add Service Reference… They are hard to maintain and dispose of correctly.

One way to create a proxy to a WCF service is to inherit ClientBase<T>. It works pretty well, except that someone at Microsoft must have made a mistake when implementing its Dispose functionality. Or more precise, its lack of. According to their recommendations; to be sure to close the proxy once you are done using it, the client code should be bloated with enormous try-catch blocks.

What is natural for me is to use using-blocks, but apparently this is not possible without some customization.

Custom Client Proxy

Out on the ?internet?, there exists many suggestions how to do this. What has been working for me is to use the following wrapper around the ClientBase<T>.

1
2
3
4
5
6
7
8
9
10
11
12
13
14
15
16
17
18
19
20
21
22
23
24
25
26
27
28
29
30
31
32
33
34
35
36
37
38
39
40
41
42
43
44
45
46
47
48
49
50
51
52
53
54
55
56
57
58
59
60
61
62
63
64
65
66
67
68
69
70
71
72
73
74
75
76
77
78
79
80
81
using System;
using System.ServiceModel;
using System.ServiceModel.Channels;

namespace Example.Wcf
{
public interface IServiceClient<T> : IDisposable where T : class
{
T Proxy { get; }
}

public class ServiceClient<T> : IServiceClient<T> where T : class
{
private class ClientProxy<TChannel> : ClientBase<TChannel> where TChannel : class
{
public ClientProxy()
{
}

public ClientProxy(Binding binding, EndpointAddress remoteAddress) : base(binding, remoteAddress)
{
}

public TChannel Proxy
{
get { return Channel; }
}
}

private bool _disposed;
private readonly ClientProxy<T> _clientProxy;

public ServiceClient(Binding binding, EndpointAddress remoteAddress)
{
_clientProxy = new ClientProxy<T>(binding, remoteAddress);
}

public ServiceClient()
{
_clientProxy = new ClientProxy<T>();
}

public T Proxy
{
get { return _clientProxy.Proxy; }
}

public void Dispose()
{
Dispose(true);
GC.SuppressFinalize(this);
}

protected virtual void Dispose(bool disposing)
{
if (_disposed)
return;
if (!disposing)
return;
if (_clientProxy.State == CommunicationState.Faulted)
{
_clientProxy.Abort();
return;
}
try
{
_clientProxy.Close();
}
catch
{
_clientProxy.Abort();
}
_disposed = true;
}

~ServiceClient()
{
Dispose(false);
}
}
}

With it you can either provide the client configuration in your App/Web.config like so:

1
2
3
4
5
6
7
8
9
<?xml version="1.0" encoding="utf-8"?>
<configuration>
<system.serviceModel>
<client>
<endpoint address="net.pipe://localhost/Example.Wcf/myservice.svc"
binding="netNamedPipeBinding" contract="Example.Wcf.IMyService" />
</client>
</system.serviceModel>
</configuration>

Or inject it manually in the ServiceClient(Binding, EndpointAddress) constructor.

How do you use prefer to use WCF clients?

Project Example

Dirty Harry Planning With TFS

Planning is hard. If you overestimate your ability to beforehand know details of the future, your planning will fail. Even if you only plan for a two week iteration. Like Harry Callahan said in Magnum Force, ?a man’s got to know his limitations?.

Problem

This article is based on the Scrum Process Template, since I think it is the most popular one.

If used right, TFS is a great tool for planning project work. Unfortunately it is fairly common that its planning capabilities are used in a counterproductive way which can make TFS hard to work with.

  • If lots of PBIs are added to the backlog it makes it hard to get an overview. For example to know which PBIs needs more attention before they can be started to work on, one need to categorize them somehow. Some do it by a parent-child relationship between PBIs, but then it hard to prioritize between PBIs belonging to different parents since TFS orders the backlog by their respective parents.
  • People tend to focus on the Iteration Backlog which makes it easy to forget about the more important large scoped workflows. It is common that the team focus on micro managing stuff that really does not matter, like task beak down and estimation. It is not uncommon to find PBIs with more than ten tasks added to them.
  • Most tasks are added during the planning meeting, but almost always some are added during the sprint to cover for details which was not initially thought of. Some call this scope creep, but it should really be called bad planning.

Discussion

When planning, a primary concern should be making PBIs that are small enough so that they can be delivered when the sprint is over. The larger a PBI gets, the higher the risk that it does not reach ?done? (whatever that means for your team) at the end of the sprint. Half-finished PBIs need to be split which is not only a time consuming activity in itself, but is also bad for accuracy of the Velocity key metric.

Your coworkers depend on the state of the PBI and not the state of its tasks. For example, a test specialist might be interested in PBIs that are ready to be tested. A developer specialist wanting to start working on a PBI might be interested in when a dependent upon PBI is implemented. If the team hangs around in the Sprint Backlog these states are not visual enough, nor are they easy to update.

If the team backlog is a mix of PBIs that are ready to work on, and some are not, it is hard to know what items to handle during a grooming meeting. The result in the long run can be a backlog full of junk which is prioritized in an order that cannot be trusted.

Why using tasks might be a bad idea

If you are used of adding tasks to a PBI you might feel that it is not that important to fill in the Description field. When the description field is empty you will most likely forget about the Acceptance Criteria as well.

One can question the tradeoff from using tasks in your team. Is it really that important for you to check in code against a task? Are your burndown charts that precious that you must have them? Especially if they do not even slope downward, as often is the case.

If you do not have tasks, you are forced to do a better job creating the PBIs. For example, they automatically get smaller and with more detailed information. Project stakeholders will be happy. And as a nice bonus for yourself, you are no longer asked to estimate bogus hours on tasks. When was the last time that it played out as you thought? Everybody wins!

Well, using tasks might be a good idea for some. Maybe your project has very few dependencies, your team is experienced and you know very well what has to be done. But still, the first step for everyone should be to get familiar with PBIs and how they should be used. Then after you think you have mastered their creation and workflow activities, go ahead and use tasks.

How to use TFS to keep a clean backlog

It is a bad idea to keep your planning of future sprints in the team backlogs.

One might be tempted to do the planning in another tool, but that is not optimal either. It is always best to keep all related information in the same place. TFS actually comes with the possibility to have different backlogs for different teams, which solves this problem.

In a project consisting of two teams, one might use the following configuration:

Teams

  • Root Team, can access both team backlogs
  • PO Team, planning of future PBIs
  • Team 1
  • Team 2

Area configuration

  • Future, default for PO Team
  • Team, default for Root Team
    • 1, default for Team 1
    • 2, default for Team 2

Planning for the future and grooming activities are performed in the PO team, which results in clean backlogs for the other two teams. Most of the time, they will only contain items from the current sprint. This makes the Backlog Items Board usable in the iteration. The combined status of the teams can be examined through the Root Team backlog.

Customizing Kanban Columns

PBIs and Bugs comes with two types of states. The normal New-Approved-Committed-Done state, and a customizable Kanban state. The latter can be thought of like a sub-state of the normal state. It can unfortunately not be shared across teams, but is an easy way to customize the workflow within a team. The Kanban states are represented by columns in the Backlog Items Board.

To illustrate what is possible, I have taken screen shots from the respective team backlogs of my example. These can be customized without changing the Scrum Process Template, which means that it does not matter if you run an On Premise TFS installation or in the cloud service Visual Studio Online.

The PO Team Backlog

PO backlog

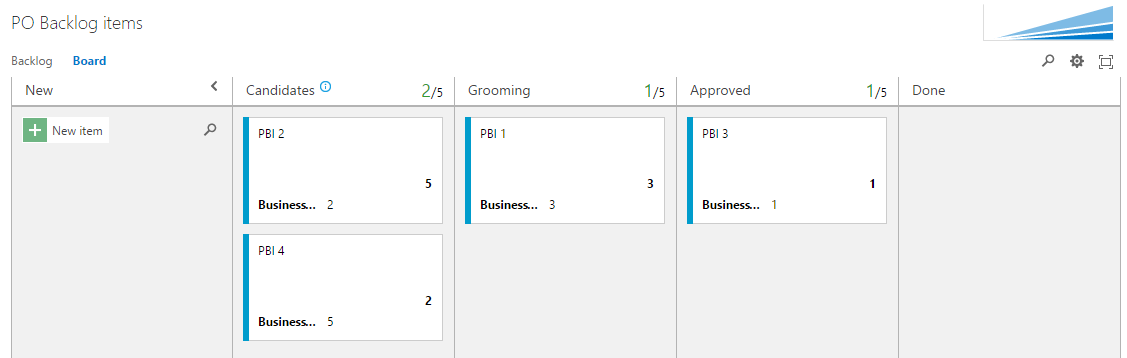
The PO Team is responsible for creating new PBIs, which are given the new state by default. The Kanban columns Candidates and Grooming are added as sub-states of New. When a PBI is detailed enough so that work can be started it is moved to the Approved column which sets the Approved state. The PBI will not show up in a team backlog until it is moved to the area path of a team.

Note that the Business Value field is added in the cards because it gives great meaning for the PO Team.
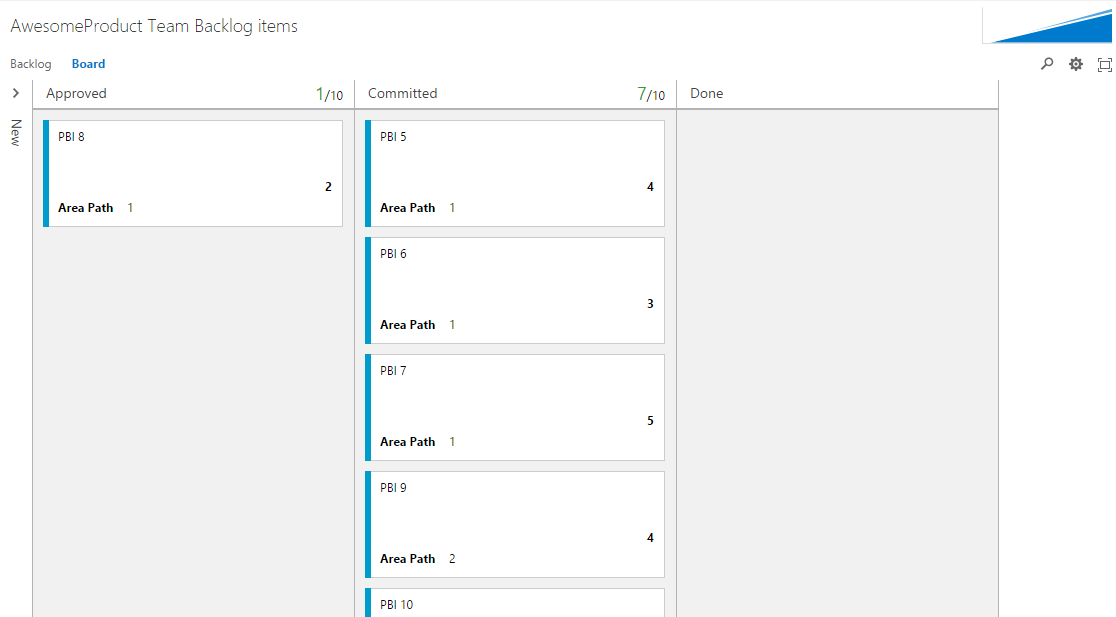
The Team 1 Backlog

Team 1 Backlog

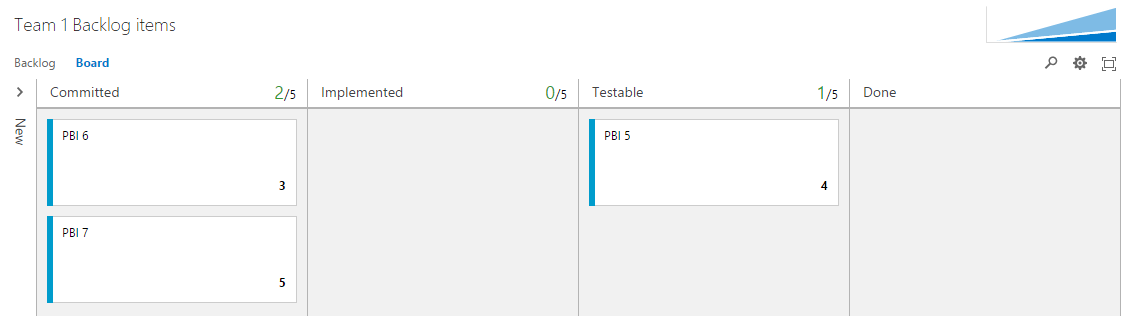
The Team 1 and 2 are responsible for implementing approved PBIs from the PO Team. PBIs which are committed to during a sprint is moved to the Committed state. The Approved state is not shown in the Board since sprint planning is normally done in the Backlog- and not in the Board view.

The Kanban columns Implemented and Testable are added as sub-states of Commited. When tests are passed PBIs are moved to the Done column which sets the Done state.

The Team 2 Backlog

Team 2 Backlog

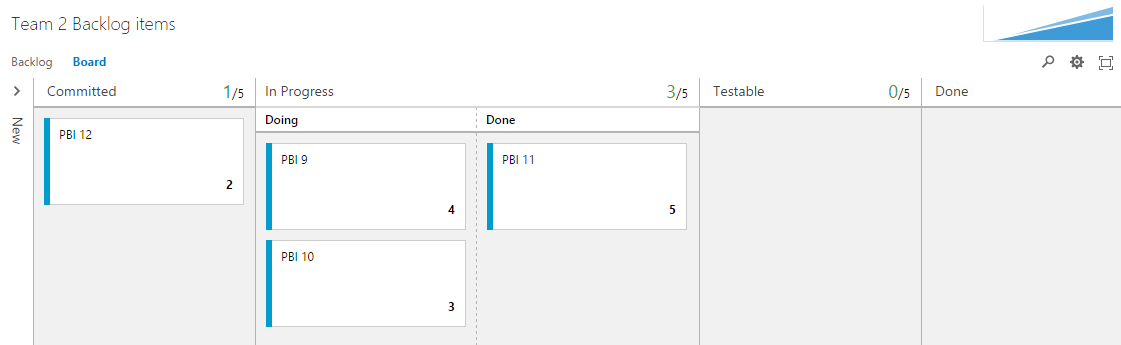
Here the Kanban columns In Process and Testable are added as sub-states of Committed. In Process use the Split Column functionality.

The Root Team Backlog

Root Team Backlog

The Root Team is not used to do any real work but only view the combined backlogs of Team 1 and 2. Since Kanban states are not shared cross teams there is no use adding any extra columns to the board.

Because work items are included from different teams it gives meaning to display the area path on the cards.

Using Excel to Move PBIs between Areas

A nice feature of TFS is that you can edit work items through Excel. In short it gets a list of work items from a Query and lets you edit them all in a spreadsheet instead of doing it one by one. It also lets you create new work items or change parent-child relations.

To use this feature you have to have Excel (obviously) and Visual Studio installed. You can read in the instructions on MSDN that it is sufficient to install Team Explorer if you do not already have Visual Studio installed, although I have never tried that for myself.

To get started simply open Excel, under Team ribbon click New List, Select your Query and you are good to go. When you are done editing press Publish to upload your changes to TFS.

Edit Work Items with Excel

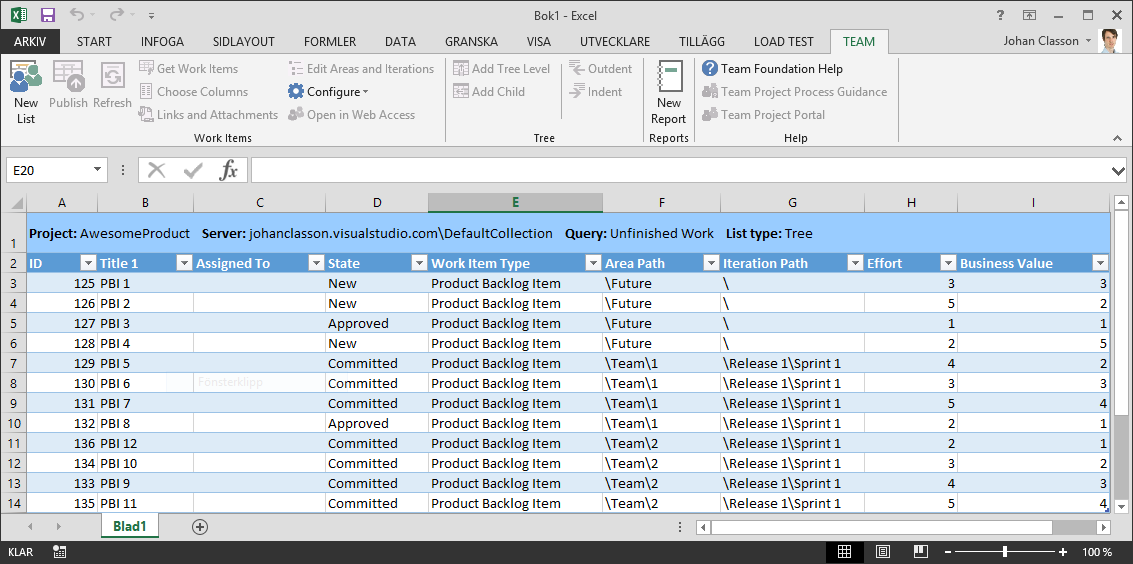
Using the TFS spreadsheet functionality is the most convenient way to move approved PBIs from the PO Team to one of backlogs of Team 1 or 2.

Final comment

Note that there are intentionally no iterations in my example. I did not check any iterations because I would like to help (or force if you are fond of strong words) the teams to keep their PBIs in order.

Happy planning!