Release Notes With Azure DevOps

The process that suites your team best might be different from what might be best for someone else. In this blog post, I would like to share how you can construct release notes with Azure DevOps in a nice ordered fashion.

When you need to publish release notes you might be facing difficulties such as:

  • How to make them awesome (!).
  • How to reach your audience.
  • How to be as effective as possible.

TL;DR;

1) Write release notes in Product Backlog Items (PBIs).
2) Collect release notes from PBIs into a Markdown document.
3) Review by pull request (PR).
4) Publish.

Making Them Awesome

What Changes Have Been Introduced Since Last Release?

Obviously, you need some way to find out which changes that have been made, and also, which of those that are candidates to be included in the release notes.

Just prior to the release, you could construct a list of all changes manually, for example by summarizing the pushed commits. This approach is optimal if your team works in an ad-hoc fashion or without planning.

If you really want to, you can diff what code that changed since last release, and then write the release notes with that as guidance.

You might be tempted to use a Git repository log as reference, be aware of that commit messages might not be the best source of information for release notes since they are often written for other developers! If developers are indeed your target audience, you could just as well direct them to your repository instead of summarizing its log in a document somewhere.

My point here is that I do not recommend you relying on a tool for summarizing your release notes. By just planning a little you will have your summary already. For example, if you decide beforehand what to include in a release, then you will already have a nice list of what to include in the release notes.

What Changes Might Be of Importance to the Audience, and What Changes Might Not?

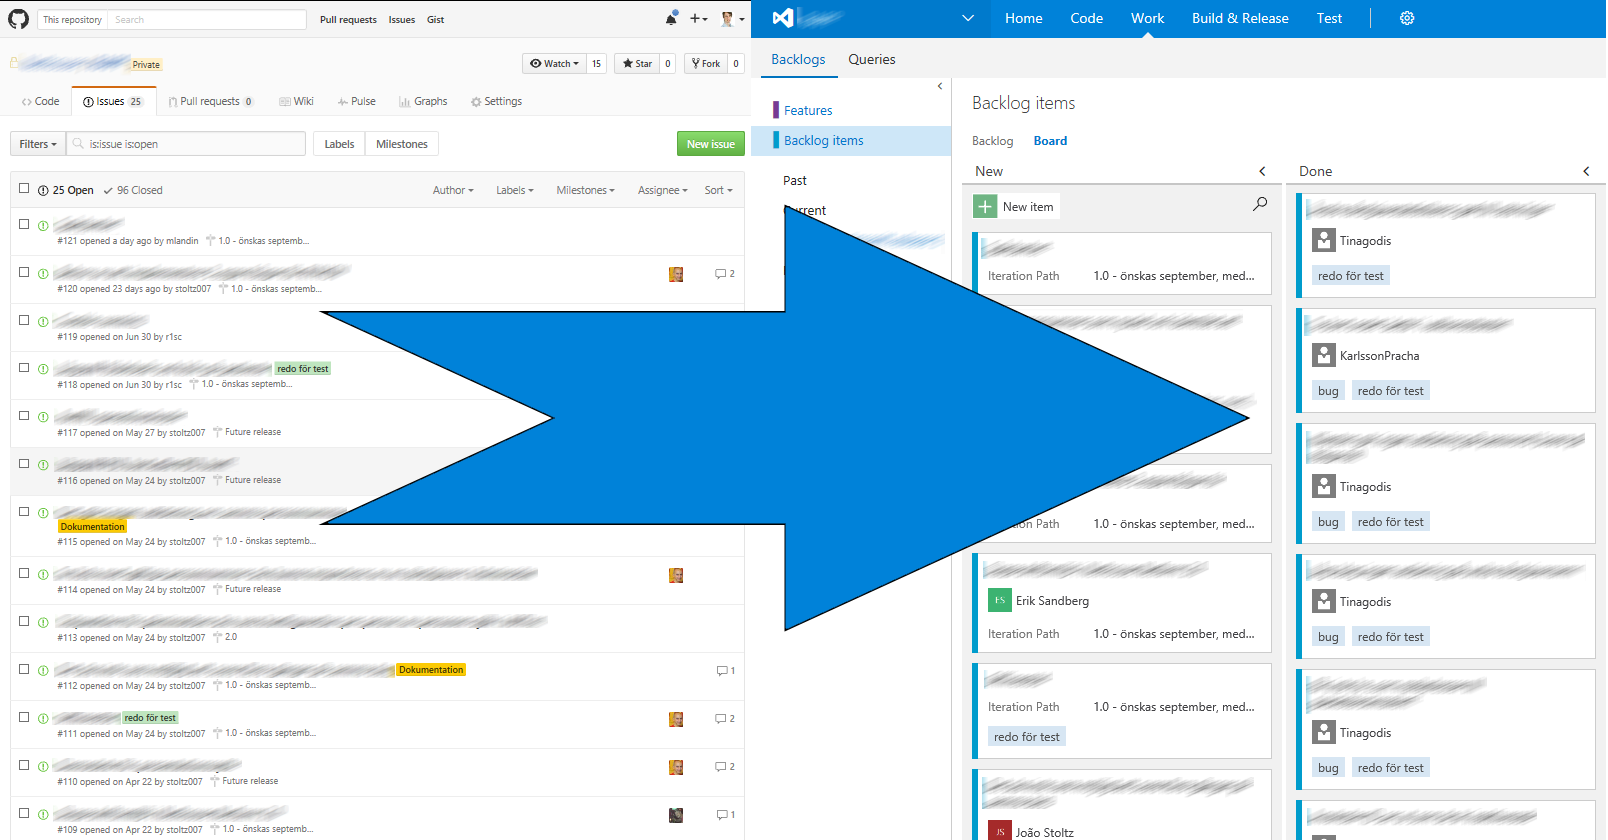
In Azure DevOps I plan my releases with PBI work items. I have found it convenient to include a custom boolean field in the PBI that I can then use for making a query to select just the right PBIs to include in the release notes.

If you have different audiences, you can consider adding multiple boolean fields, one for each audience.

How to add custom fields to work items are described in the official Azure DevOps documentation.

How Can You Make Sure That the Information in the Release Notes Are Correct?

In my opinion, the ones best qualified to describe a change is probably the ones that have implemented it. This means that I do not think that it is a good idea to let just a few people write the release notes. Instead you should have your whole team engaged in writing them.

You might think that this is overkill, but in the best of worlds, I think that you would benefit from writing the release notes for a PBI before you start implementing it. The idea is to force you to think about the end-user or customer’s perspective as early as possible in your development process.

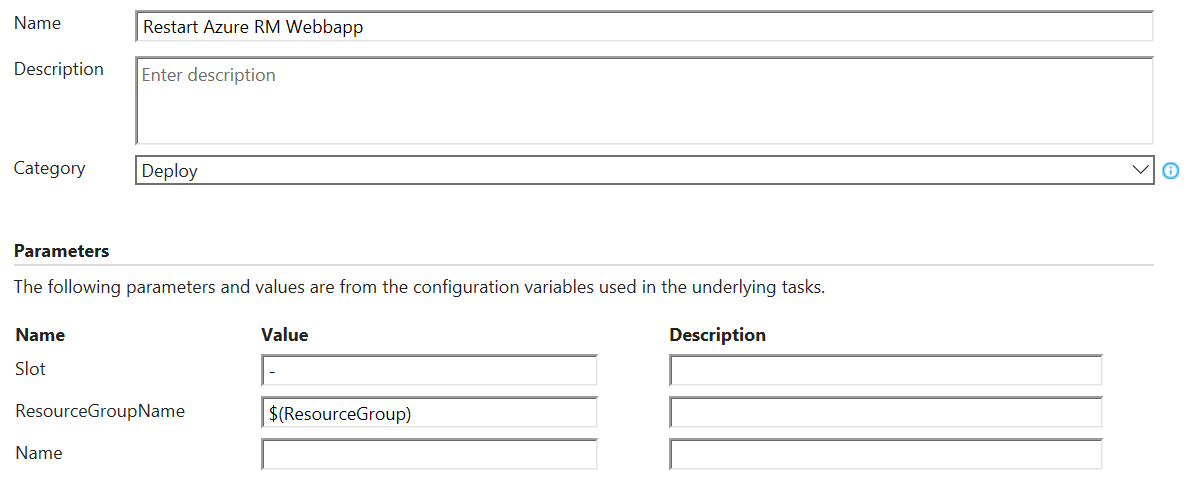
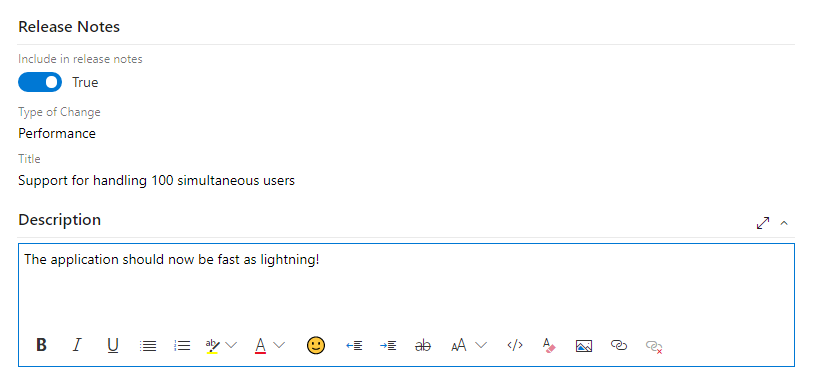
I recommend that you include custom text-fields for release notes directly in the PBI. That way it will be easy to find where to write. Here is an example.

PBI custom fields for making release notes with Azure DevOps

If your team do not commit to writing release notes beforehand, you could add a reminder for everyone to finish their release notes by including it in your team’s definition of done.

How to Make the Release Notes Readable?

Of course you can make a best effort writing nice readable descriptions for each PBI. I imagine this is a matter of personal opinion, but I think it is hard to make proof-reeding when I only have the release notes from a single PBI on the screen. Therefore, I like to collect all release notes from the PBIs into a single document before the review process begins.

I treat that single document as the final product, and hence I often do not care to update the descriptions in the PBIs. These can be seen upon as just history if you will.

You can find an example how to generate release notes in Markdown format using PowerShell in this gist. The script iterates all work items returned by a query and constructs the document content from the custom title- and description-fields in those.

Here is an example of how to use it:

1
2
3
4
$content = .\Get-ReleaseNotes.ps1 -Pat 'abc123' -Organization 'Fabrikam' -Project 'Fiber' -Query 'My Queries/Release Notes'
$utf8NoBomEncoding = New-Object System.Text.UTF8Encoding $False
$path = Join-Path (Resolve-Path .\notes) sprint-11.md
[System.IO.File]::WriteAllLines($path, $content, $utf8NoBomEncoding) # Outputs UTF8 without BOM

My format of choice for release notes is Markdown, and that is because of the following reasons.

  • Markdown is a perfect format for making reviews through PRs to a Git repository.
  • It is relatively easy to convert Markdown into whatever format you need to publish in.

I would like to stress that the more people that are engaged in both writing and reviewing release notes the better they become. In addition to involving technical experts in the review process, I also like to have generally skilled writers review the document at least once before it is published.

How to Reach Your Audience

Difference audiences a best reached by different means. For example, if you do not have direct contact with your end users you might want to publish your release notes as HTML on your product’s website. Or if your audience does not actively search for release notes you might want to consider publishing your release notes as a PDF-file which you mail to your end users.

If you would like to be fancy, you can integrate the release notes into the actual product so that your end users can pull up-, or are presented with-, the release notes just as they use the new version of your product the first time.

How to Be as Effective as Possible

Doing all of this planning, PBI-tinkering and reviewing might seem like a lot of work. But I hope that you might soon realize that it is indeed less work compared to manually construct release notes in an ad-hoc fashion.

Also, when you write the release notes close to when you design or implement a change, then you do not have to spend as much time figuring out what to write.

I think that being effective is not only about spending less time writing release notes, but also that you also produce content with high quality. The review process is essential to archive this. Please do not skip reviewing of your release notes!

If your teams are already familiar with doing PRs to review code, reviewing release notes in the same way should not be so complicated.

Process

Here I will summarize an example of how the overall process might look like.

The release notes owner manages a work item query which selects the work items which are meant to be included in the release notes.

An overview of the process around creating release notes is presented below.

Process Overview

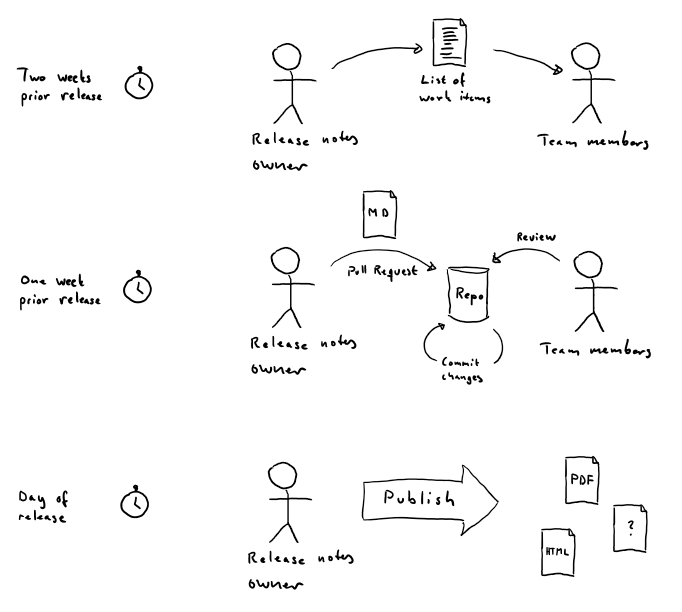
Two Weeks Prior Release

The release notes owner executes the query and mails its result to the team members who can see if some work items are missing or should be removed.

One Week Prior Release

When everyone has completed entering the release notes in the selected work items, the release notes owner generates a Markdown-file and starts a pull request. The team reviews the document, correcting mistakes until everyone agrees that the quality is high enough at which point the pull request is merged.

Day of Release

The release notes owner triggers an automated process which converts the Markdown-file to various possible formats.

Asynchronously Wait for Task to Complete With Timeout

I was recently working at an async method which could possibly hang if some dependent stuff did not happen. To prevent the method from hanging, I wanted to implement some kind of timeout. Now, how can I make a task abort, given the following method signature?

1
2
3
4
5
6
7
public class SomeClient
{
public async Task DoStuffAsync(CancellationToken? ct = null)
{
...
}
}

Take One - Task Extension Method

The plan was to implement som kind of extension method to Task which could add the timeout-functionality.

1
2
3
4
5
6
7
8
9
10
11
12
internal static class TaskExtensions
{
public static async Task TimeoutAfter(
this Task task, int millisecondsTimeout, CancellationToken ct)
{
var completedTask = await Task.WhenAny(
task, Task.Delay(millisecondsTimeout, ct));
if (completedTask == task)
return;
throw new TimeoutException();
}
}

And use it like this.

1
2
3
4
5
6
7
8
9
10
11
12
13
14
15
16
17
public class SomeClient
{
public async Task DoStuffAsync(
CancellationToken? ct = null, int millisecondsTimeout = 20_0000)
{
...
var notNullCt = ct ?? CancellationToken.None;
await DoStuffInnerAsync(notNullCt).TimeoutAfter(
millisecondsTimeout, notNullCt);
...
}

private async Task DoStuffInnerAsync(CancellationToken ct)
{
...
}
}

This design allowed that the internal Delay-task would be cancelled if the user of my API canceled the method call. Nice! But it also had some mayor disadvantages:

  • No task will be canceled if either of them finish successfully, which leads to having tasks running in the background for no reason, eating system resources.
  • I had to make sure to pass the same cancellation token both to DoStuffInnerAsync and TimeoutAfter, which might be something that could lead to mistakes further down.

Take Two - Expanding the Extension Method

To be able to cancel the TimeoutAfter-task i needed a CancellationTokenSource-instance, and pass its token to the TimeoutAfter-method. And I also wanted the TimeoutAfter-task to cancel if the user canceled the public API call.

This is what I came up with.

1
2
3
4
5
6
7
8
9
10
11
12
13
14
15
16
17
18
19
20
21
internal static class TaskExtensions
{
public static async Task TimeoutAfter(
this Task task, int millisecondsTimeout, CancellationToken ct)
{
using (var cts = new CancellationTokenSource())
{
using (ct.Register(() => cts.Cancel()))
{
var completedTask = await Task.WhenAny(
task, Task.Delay(millisecondsTimeout, cts.Token));
if (completedTask == task)
{
cts.Cancel();
return;
}
throw new TimeoutException();
}
}
}
}

This is some seriously dangerous programming.

  • By subscribing to cancel-events with ct.Register(...) I opened upp the possibility for memory leaks if I do not unsubscribe somehow.
  • Also, using cts (which can be disposed) in the delegate passed to ct.Register(...) might actually make my application crash if ct was canceled outside of the TimeOutAfter-method scope.

Register returns a disposable something, which when disposed will unsubscribe. By adding the inner using-block, I fixed both of these problems.

This made it possible to cancel the Delay-task when the actual task completed, but not the reverse. How should I solve the bigger problem, how to cancel the actual task if it would hang? Eating up system resources indefinitely…

Take Three - Changing the Public API

With much hesitation I finally decided to make a breaking change to the public API by replacing the CancellationToken with a CancellationTokenSource in the DoStuffAsync-method.

1
2
3
4
5
6
7
8
9
10
11
12
13
14
15
16
17
18
19
20
21
22
23
24
25
26
27
28
29
30
31
32
33
34
public class SomeClient
{
public async Task DoStuffAsync(
CancellationTokenSource cts = null, int millisecondsTimeout = 20_0000)
{
...
var notNullCts = cts ?? new CancellationTokenSource();
await DoStuffInnerAsync(notNullCts.Token).TimeoutAfter(
millisecondsTimeout, notNullCts);
...
}

private async Task DoStuffInnerAsync(CancellationToken ct)
{
...
}
}

internal static class TaskExtensions
{
public static async Task TimeoutAfter(
this Task task, int millisecondsTimeout, CancellationTokenSource cts)
{
var completedTask = await Task.WhenAny(
task, Task.Delay(millisecondsTimeout, cts.Token));
if (completedTask == task)
{
cts.Cancel();
return;
}
cts.Cancel();
throw new TimeoutException();
}
}

Nice! But this still did not solve that I had make sure to pass the same cts to both the actual task and the Delay-task.

Final Solution - Doing the Obvious

Most things is really easy when you know the answer. By accident I stumbled upon that CancellationTokenSource has a CancelAfter(...)-method. This solves my problem entirely without the need to update my public API.

1
2
3
4
var client = new SomeClient();
var cts = new CancellationTokenSource();
cts.CancelAfter(20_000);
await client.DoStuffAsync(cts.Token);

Easy peasy. I wish I had known about this earlier!

Get Started With Invisible reCAPTCHA

To prevent software from posting forms on websites (and nowadays even on mobile apps), there is this Completely Automated Public Turing test to tell Computers and Humans Apart, also known as CAPTCHA.

When I think about CAPTCHAs, I relate to trying to read distorted letters. I don?t know how you react, but I really dislike when I am forced to solve those. Lately I have seen a few variants such as differentiating cats from dogs, picking out road signs or other objects in more or less obscure images. Although I find them to be much more pleasant, I still think that they are a PITA.

Late in 2014 Google announced their No CAPTCHA reCAPTCHA service using machine learning algorithms to detect whether a visitor is a bot or an actual person. While being much easier to use, I think it is kind of silly to have to tick a checkbox where I claim not to be a robot.

I must have been living under a rock the past year. I just recently found out that Google have an invisible version of their reCAPTCHA service, which was announced as early as march 2017!

To get started:

1) Register for an API key

2) Include something similar to the following in your html

1
2
3
4
5
6
7
8
9
10
11
12
13
14
15
<script src="https://www.google.com/recaptcha/api.js" async defer></script>
<script>
function onSubmit(token) {
document.getElementById("login-form").submit();
}
</script>
...
<form id="login-form" ...>
...
<button class="g-recaptcha"
data-sitekey="{Insert API key here}"
data-callback="onSubmit">
...
</button>
</form>

3) Validate the posted form parameter g-recaptcha-response service side by making a HTTP POST to https://www.google.com/recaptcha/api/siteverify with the query parameters ?secret={API secret}&response={g-recaptcha-response}&remoteip={Remote user IP}.

The invisible reCAPTCHA is in my opinion a truly incredible service! Read more about it in the official docs, or try the demo.

Handle Secrets With .NET Core

Have you ever checked in a configuration file with a secret? Now is the time for you to do something better. In this post, I will show four convenient ways in which configuration secrets can be stored outside of your source code repository.

TL;DR

NuGet-package Microsoft.Extensions.Configuration.EnvironmentVariables:
1
2
3
string secret = builder
.AddEnvironmentVariables(prefix)
.Build()[key];
NuGet-package Microsoft.Extensions.Configuration.UserSecrets:
1
2
3
string secret = builder
.AddUserSecrets(userSecretsId)
.Build()[key];

File with secrets at %APPDATA%\Microsoft\UserSecrets\{userSecretsId}\secrets.json.

NuGet-package Microsoft.Extensions.Configuration.AzureKeyVault:
1
2
3
string secret = builder
.AddAzureKeyVault(vaultUrl, clientId, certificate)
.Build()[key];
NuGet-packages Microsoft.Azure.KeyVault and Microsoft.Azure.Services.AppAuthentication:
1
2
3
var secret = await new KeyVaultClient(new KeyVaultClient.AuthenticationCallback(
new AzureServiceTokenProvider().KeyVaultTokenCallback))
.GetSecretAsync(vaultUrl, key);

Secrets Stored Locally

Imagine that you are part of a team and that you work on developing some new system. Since the system depends on some back-end service you have a password in the systems .config- or .json configuration file, if not for something else, just so that you can to run the system on your local machine.

When you commit your code, you couple the access restrictions of the beck-end service to that of the repository. Or in other words, you will have to make sure that no one has access to the source code that is not allowed to access the back-end service.

Yes, you can always remove the password from the repository history, or even rotate the secret on the back-end service when development on your new system has stopped. But those two options might show to be quite cumbersome in practice.

A better option would have been to store the password on a location outside of your source code repository.

Environment Variables

Using environment variables to store secrets is a simple but effective solution. Since environment variables is a standardized mechanism that is available in most operating systems, there is a wide range of tooling that can make your life easier. One example is Docker which has great support for setting environment variables for containers.

Here is an example of how to use the AddEnvironmentVariables extension method of the NuGet package Microsoft.Extensions.Configuration.EnvironmentVariables.

1
2
3
4
5
6
7
8
9
10
public static class Program
{
private static void Main()
{
var builder = new ConfigurationBuilder();
builder.AddEnvironmentVariables("MYAPP_");
IConfiguration configuration = builder.Build();
Console.WriteLine($"Ex1 EnvironmentVariables: {configuration["MySecret"]}");
}
}

In my opinion, it is a good practice to use a prefix filter. In the myriad of other environment variables, I find it nice to have the ones belonging to my apps grouped together. In my example above, the value of the variable with name MYAPP_MYSECRET will be available through configuration["MySecret"].

Also, a good feature is to group related variables into sections. When environment variables are added to the configuration instance, names with __ are replaced with :. This enables getting sub sections, or/and using the options functionality.

If you are used to get configuration values through a static resource such as the ConfigurationManager of the .NET ?Full? Framework, I recommend reading about how dependency injection can be done with ASP.NET Core, just to get you started with how to inject the configuration instance to where it is needed.

User Secrets

Another option is to use the AddUserSecrets extension method of the NuGet package Microsoft.Extensions.Configuration.UserSecrets. It enforces that the secrets are stored in the AppData- or Home-directory.

1
2
3
4
5
6
7
8
9
10
11
12
13
14
public static class Program
{
private static void Main()
{
var builder = new ConfigurationBuilder();
var env = new HostingEnvironment { EnvironmentName = EnvironmentName.Development };
if (env.IsDevelopment())
{
builder.AddUserSecrets("MyUserSecretsId");
}
IConfiguration configuration = builder.Build();
Console.WriteLine($"Ex2 UserSecrets: {configuration["MySecret"]}");
}
}

Secrets are read from a json-file located at %APPDATA%\Microsoft\UserSecrets\{UserSecretsId}\secrets.json on Windows or ~/.microsoft/usersecrets/{UserSecretsId}/secrets.json on Linux. I find it most convenient to supply the application id directly in the AddUserSecrets-method, but you can set the id in the .csproj-file as well, or by using the assembly attribute like [assembly:UserSecretsId("MyUserSecrets")]. If you really want to do something hard core, you can set the UserSecretsId with a MSBuild property like /p:UserSecretsId=MyUserSecrets.

There is some CLI tooling ment help you manage the secrets.json file. But I find it so dead simple to create the secrets.json file manually that I seldom bother to use the CLI.

The content of secrests.json can be something like this:

1
2
3
{
"MySecret": "Some value"
}

Since it is not a good practice to have unencrypted secrets on the file system, I recommend only using UserSecrets for local development.

Secrets Stored in a Shared Location

Back to my imaginary development scenario.

All is working well, and every team member is productive running the system. Your team is making great progress. But then all of a sudden, the back-end service password is rotated for whatever reason, and productivity stops.

Of course, one could prioritize to take the time to prepare everyone in the team of the rotation. But if you don?t, your colleagues will get runtime exceptions when they run their system. When they have found out that the reason that they got access denied was because of a rotated password, they can finally get up to speed again. That is, if they are able to find out what the new password is.

A possible way to solve this is to store the password in a shared location such in a common database, which preferably is encrypted. That is a solution that works well, and it is normally not that hard to encrypt the passwords. At least not with SQL Server.

Azure Key Vault

An even better approach would be to use a product specialized for secrets distribution, such as Azure Key Vault (AKV). I think the tooling around AKV is great. Since it has a REST API, you can access it from most platforms, and there is support in Azure Arm Templates to get secrets from AKV when they are run. Besides usability, AKV is not very expensive to use for secrets. It is so cheap that I mostly consider it to be a free service.

For accessing secrets in AKV one needs to authenticate and pass in an access token. Applications that need to authenticate with Azure Active Directory (AAD) do so with credentials stored in service principals. If needed, an application can have many ways to authenticate, and each set of credentials is stored in a separate service principal.

Authentication with service principals are made with an application id and either a client secret or a certificate. So, which one is the better option?

Secrets might seem easy to use but have the drawback that they can be read. By using secrets, you again couple the access restrictions. This time, the coupling is between access to the settings of the application and to whatever resources that application is meant to access.

Certificates are in fact also relatively straight-forward to use. You can even generate a self-signed certificate and use that to create a service principal in AAD with just these few lines of PowerShell:

1
2
3
4
5
6
7
8
9
$cert = New-SelfSignedCertificate -CertStoreLocation "cert:\CurrentUser\My" `
-Subject "CN=my-application" -KeySpec KeyExchange
$keyValue = [System.Convert]::ToBase64String($cert.GetRawCertData())

$sp = New-AzureRMADServicePrincipal -DisplayName my-application `
-CertValue $keyValue -EndDate $cert.NotAfter -StartDate $cert.NotBefore
Sleep 20 # Wait for service principal to be propagated throughout AAD
New-AzureRmRoleAssignment -RoleDefinitionName Contributor `
-ServicePrincipalName $sp.ApplicationId

If you want a longer certificate validity than one year, use the argument -NotAfter for New-SelfSignedCertificate.

Here is an example of how to get a secret from AKV by using the AddAzureKeyVault extension method of the NuGet package Microsoft.Extensions.Configuration.AzureKeyVault:

1
2
3
4
5
6
7
8
9
10
11
12
13
14
15
16
17
18
19
20
21
22
23
24
25
26
public static class Program
{
private static void Main()
{
var builder = new ConfigurationBuilder();
builder.AddAzureKeyVault(
vault: "https://my-application-kv.vault.azure.net/",
clientId: "865f36f7-08c1-4ca2-97c9-a5a9cab56fd8",
certificate: GetCertificate());
IConfiguration configuration = builder.Build();
Console.WriteLine($"Ex3 AzureKeyVault: {configuration["MySecret"]}");
}

private static X509Certificate2 GetCertificate()
{
using (X509Store store = new X509Store(StoreLocation.CurrentUser))
{
store.Open(OpenFlags.ReadOnly);
var cers = store.Certificates.Find(
X509FindType.FindBySubjectName, "my-application", false);
if (cers.Count == 0)
throw new Exception("Could not find certificate!");
return cers[0];
}
}
}

For loading a certificate in an Azure App Service, add a WEBSITE_LOAD_CERTIFICATES app setting with the certificate thumbprint as value. For more details on this, read the official docs.

When calling the Build-method, all secrets are read in from AKV at once and are then kept in the configuration. Secret names with -- are replaced with : when they are read in.

AppAuthentication and KeyVaultClient

Just a few days ago, Microsoft released the NuGet package Microsoft.Azure.Services.AppAuthentication. It contains an AzureServiceTokenProvider that abstracts how to get an access token from AAD.
To use it together with the KeyVaultClient in the NuGet package Microsoft.Azure.KeyVault, you simply insert a callback method of the token provider in its constructor.

public static class Program
{
    private static async Task Main()
    {
        var azureServiceTokenProvider = new AzureServiceTokenProvider();
        var keyVaultClient = new KeyVaultClient(
            new KeyVaultClient.AuthenticationCallback(
                azureServiceTokenProvider.KeyVaultTokenCallback));
        var secret = await keyVaultClient
            .GetSecretAsync(
                vaultBaseUrl: "https://my-application-kv.vault.azure.net/",
                secretName: "MySecret");        
        Console.WriteLine($"Ex4 AppAuthentication: {secret.Value}");
    }
}

To configure how AzureServiceTokenProvider will acquire tokens you can provide a connection string, either by passing it as a parameter in the constructor or by setting it as the environment variable AzureServicesAuthConnectionString. If no connection string is provided, such as in my example above, the AzureServiceTokenProvider will try three connection strings for you and pick one that works.

If you are using the NuGet package Microsoft.Extensions.Configuration.AzureKeyVault to get secrets from AKV, which I wrote about in the previous example, you need to have a service principal for local development, preferably with a certificate for authentication. Yes, you can use Microsoft.Extensions.Configuration.EnvironmentVariables or Microsoft.Extensions.Configuration.UserSecrets to add secrets. But as I mentioned before, distributing them in your team might be an unnecessary pain.

AzureServiceTokenProvider solves this rather nice. You and your team members can use your own accounts for accessing AKV, and your production application can use its own account for accessing AKV. Everything is either picked out for you, or it can be configured at deploy-time.

I have tried to summarize the supported connection string types below for you. For full details see the official documentation.

Local development

For local development scenarios, credentials can be taken from a live Azure CLI session, a logged in user in Visual Studio, or the local user account on a computer that is joined to the domain of the AKV.

  • RunAs=Developer; DeveloperTool=AzureCli
  • RunAs=Developer; DeveloperTool=VisualStudio
  • RunAs=CurrentUser;
Since Visual Studio 2017 Update 6 you can set the account under Tools -> Azure Service Authentication.

If you are not using Visual Studio, Azure CLI 2.0 is the fallback. Run az login and go!

Service Principals

  • RunAs=App;AppId={AppId};TenantId=NotUsed;CertificateThumbprint={Thumbprint};CertificateStoreLocation={LocalMachine or CurrentUser}
  • RunAs=App;AppId={AppId};TenantId=NotUsed;CertificateSubjectName={Subject};CertificateStoreLocation={LocalMachine or CurrentUser}
  • RunAs=App;AppId={AppId};TenantId=NotUsed;AppKey={ClientSecret}
When used together with `KeyVaultClient`, the TenantId part of the connection string is not used, although `AzureServiceTokenProvider` throws an exception if it not provided. This is something that will [change in an upcoming version](https://github.com/Azure/azure-sdk-for-net/issues/4169) of `Microsoft.Azure.Services.AppAuthentication`.

Azure Managed Service Identity

Azure has a service called Managed Service Identity (MSI) which essentially provides service principals which are maintained by Azure. MSI is supported in App Service, Functions and Virtual Machines. See the official docs for more details.

  • RunAs=App;
This is fantastic! No more hassling about generating certificates or rotating secrets.

Automatic Mode

If no connection string is provided, AzureServiceTokenProvider will try to resolve tokens in the following order:

  1. MSI
  2. Visual Studio
  3. Azure CLI
If you use MSI in production and Visual Studio or Azure CLI for development, there is no need for any configuration. Yeah!

Creating ARM Service Endpoints From Within VSTS

First, here is some background about what Visual Studio Team Services (VSTS) can do concerning Azure Resource Manager (ARM).

As you probably know, Releases in VSTS has the capability to deploy build artifacts to subscriptions in Azure. Releases are configured through a list of tasks that performs the actual work, such as for example creating infrastructure with ARM-templates, or web-deploying applications to App Services.

VSTS lets you store connection details to Azure Subscriptions in Service Endpoints for later reuse in release tasks.

There are many Service Endpoint types, but the one of interest regarding ARM is the Azure Resource Manager Service Endpoint. When you create a new ARM Endpoint you enter its name, select one your Azure subscriptions in a dropdown, and if you are lucky, VSTS will create the connection. I will explain the prerequisites to be ?lucky? below.

Add ARM endpoint dialog in VSTS

The connection is actually an Azure application which use its service principal in the Azure Active Directory (Azure AD) to access subscriptions.

If you cannot find the subscription you intend to deploy to in the drop down, or if VSTS fails to create the endpoint, you can attempt to create it manually, either by creating the application and service principal by hand in the Azure Portal, or through the PowerShell API. Here is a blog post by Roopesh Nair that explains the procedure in more detail. It links to a PowerShell script that I have used on many occasions as a base when I had to set things up manually.

Manual or Automatic Creation

As you might already know, ARM service endpoints can only be shared within the team project where they are created. Since it takes a few minutes to get through the manual steps, I think that creating ARM Endpoints manually is a real pain, especially if your company use many team projects. I find it more beneficial to spend time to configure the subscriptions so that each user can let VSTS create the endpoints automatically for them, right when they are needed.

Automatic ARM Endpoint Creation Prerequisites

Here is a list of prerequisites that needs to be met to make VSTS able to create applications and grant subscription rights to their service principals. Some are more obvious than others.

  • You must have an activated Azure Subscription (Duh!).
  • Each subscription belongs to an Azure AD, and the account that you use to log into VSTS with needs to be present there.
  • The account needs to be able to create an application in the Azure AD.
  • The account needs to have the */read and Microsoft.Authorization/*/Write permissions in the subscription.

Creating an Azure Subscription

If you have a Visual Studio Subscription or a Windows Developer account, you can activate your subscription with free credits through https://my.visualstudio.com. If you intend to use the subscription for production, create a Pay-As-You-Go subscription, preferably as a free account to start with from https://azure.microsoft.com/en-us/free.

Adding an account from another Azure AD

Adding users to an Azure AD has become much easier in the new portal compared to how it was done in the old. Now you can add or invite users in the same dialog.

If you enter a user email that corresponds to the Azure AD domain, a new user will be created. If you enter an email belonging to another domain, an invitation will be sent out, and the account will be added as a guest. I find it convenient to assign users that I add to the correct groups right in the add dialog.

Allowing Creation of Applications in Azure AD

There is a setting named Users can register applications which is found under Azure Active Directory - User settings. If set to Yes, non-administrator users are allowed to add applications to the Azure AD. If it is set to No, then your user accounts which is going to be able to add VSTS ARM Endpoints will have to be assigned to the Global administrator directory role. To my knowledge, it is not possible to add applications with any of the Limited administrator directory roles.

If your Azure AD administrator is not fond of letting people creating applications as they like, my best advice is that you create a new directory for subscriptions, and that you add the user accounts that might create ARM endpoints in that as guests.

User permissions in Azure Active Directory

Guests users gets special treatment in Azure AD, and have a setting named Guest users permissions are limited which needs to be set to No to make them able to add applications. If it is set to Yes, it will not matter if you even assign the Global administrator role to the guest account. If you need to use guest accounts, this setting needs to be set to No. Period.

Assigning the User Access Administrator Role

The application service principals VSTS creates to use to connect to subscriptions gets Contributor rights by default. Because of this, the user that creates the ARM endpoint needs to be allowed to assign permissions in the subscription.

There are two default subscription roles that have the required permissions to do this, one is the Owner role, and the other the User Access Administrator role.

One way to archive this could be to assign the accounts as subscription co-administrators, which would grant them the Owner role. This would work, but gets tedious if you have many accounts that should be able to create ARM endpoints. What is easier is to grant the role you intend to use using a group, let?s say one named VSTS Endpoint Managers.

User permissions in Azure Subscription

If you are really lucky, you have a colleague that already maintains a directory group that you can reuse.

Implementing Custom Tasks in VSTS

I think that one of the strengths of the build and release system in Visual Studio Team Services (VSTS) is the large variety of tasks that is available. If you ever want a task that does something that the default tasks can’t do, chances are high that someone else has made a task for just that purpose already, and that it’s ready to be installed from the Visual Studio Marketplace.

But sometimes you might be out of luck, and you have to make the work yourself. What now?

Create Task Groups

The easiest way to create a reusable task is to create a Task Group from an already configured tasks in a build or release definition. You create a task group by selecting one or many tasks, right clicking, and selecting Create task group.

Here is an example of a task that I’ve made that is made up of a single Azure PowerShell task.

Implementing Custom Tasks in VSTS - Task Group 1

All configuration variables, the ones named like $(abc), that are present in the tasks of a task group are put as input parameters of the task group, each with a configurable default value and description.

Implementing Custom Tasks in VSTS - Task Group 2

Task groups are great because they are so easy to make, but have the drawback of only being available in the team project where they are created.

Implementing Custom Tasks in VSTS

If you intend to share your tasks between several team projects or even accounts, your best option is to implement a custom task. Tasks in VSTS are made up of a command executable and a task manifest. The executable can be either a full blown command line application, or a simple PowerShell script. The task manifest is a json-file that contains some metadata such as the task ID, a declaration of what the configuration GUI should contain, and how the executable is invoked.

Strangely, I have not been able to find any official documentation of how to fill in the task manifest json-file. But there is an active pull request with a schema that may be useful if you ever wonder what to write.

An easy way to get started is to copy one of the default tasks of VSTS, and modify it to your needs. Just remember to generate a new ID for your custom task!

The documentation of the VSTS DevOps Task SDK encourages you to write scripts for either the agent’s Node or PowerShell3 handlers.

Look at Microsoft’s reference tasks for guidance:

Or, if you want an old school PowerShell task without that much “SDK-noise” you can copy one of mine:

I think you will find that making your own custom tasks is quite straight forward.

Install Custom Tasks With tfx-cli

One way to install a task is to use the TFS Cross Platform Command Line utility (tfx-cli) in a Node.js command prompt:

  • npm install -g tfx-cli - This installs the tfx-cli tool.
  • tfx login - The login is reused throughout the entire session.
    • Enter collection url > https://yourname.visualstudio.com/DefaultCollection
    • Enter personal access token > 2lqewmdba7theldpuoqn7zgs46bmz5c2ppkazlwvk2z2segsgqrq - This is obviously a bogus token… You can add tokens to access your account at https://yourname.visualstudio.com/_details/security/tokens.
  • tfx build tasks upload --task-path c:\path-to-repo\MyCustomTask
    • If you change your mind and do not want a task anymore, you can remove it with tfx build tasks delete --task-id b8df3d76-4ee4-45a9-a659-6ead63b536b4, where the Guid is easiest found in the task.json of your task.

If you make a change to a task that you have previously uploaded, you have to bump its version before you upload it again.

Create Team Services Extensions

Another way to install a custom task is to package it inside an Team Services extension. You can read in the official documentation how to get started, or just follow these steps.

If you do not have a publisher id already, head over to the Visual Studio Marketplace Publishing Portal and create it in one of the Azure directories which are associated with your account.

Create an extension manifest-file with the name vss-extension.json, and with content like the following:

1
2
3
4
5
6
7
8
9
10
11
12
13
14
15
16
17
18
19
20
21
22
23
24
25
26
27
28
29
30
31
32
33
34
35
36
37
38
39
40
41
42
43
44
45
46
47
48
49
50
51
52
53
54
55
56
57
58
59
60
{
"manifestVersion": 1,
"id": "UniqueExtensionId", //FIXME
"name": "Your extension name", //FIXME
"version": "1.2.3", //FIXME
"publisher": "yourpublisherid", //FIXME
//"galleryFlags": ["Public"],
"targets": [
{
"id": "Microsoft.VisualStudio.Services"
}
],
"description": "A brief description which will be shown in the marketplace tile.", //FIXME
"categories": [
"Build and release"
],
"tags": [ //FIXME
"some",
"tags",
"for",
"discoverability"
],
"content": {
"details": {
"path": "relativePathTo/README.md" //FIXME
},
"license": {
"path": "relativePathToLicenseFile" //FIXME
}
},
"links": {
"support": {
"uri": "https://some-uri.com" //FIXME
}
},
"branding": {
"color": "rgb(36, 43, 50)",
"theme": "dark"
},
"icons": {
"default": "relativePathTo/extension-icon.png" //FIXME
},
"files": [
{
"path": "relativePathToTaskFolder" //FIXME
}
],
"contributions": [
{
"id": "UniqueIdOfTask", //FIXME
"type": "ms.vss-distributed-task.task",
"targets": [
"ms.vss-distributed-task.tasks"
],
"properties": {
"name": "relativePathToTaskFolder" //FIXME
}
}
]
}

Then, run the command tfx extension create in a Node.js command prompt, and upload the generated .vsix-file in the publishing portal.

Implementing Custom Tasks in VSTS - Publishing Portal

Or if you prefer, you can use the command tfx extension publish instead, and supply your personal access token.

If the "galleryFlags": ["Public"] setting is kept commented out, the extension will default to be a private extension, meaning that the extension will only be available in the collections you choose. Access to private extensions are managed through the publishing portal.

Once your extension is battle proven, be a good community member and make it public so that all can benefit from your work.

Migrating a GitHub Repository to VSTS

Regarding migrations, I have previous experience with migrating on premise Team Foundation Servers (TFS) to Visual Studio Team Services (VSTS). Those times I used tools such as the OpsHub Visual Studio Migration Utility for copying work items and Git TFS for migrating source code.

Yes, you are right. The OpsHub utility can migrate source code as well. But since I’m a fan of Git I thought that I could do the TFVC to Git conversion when I was about to move anyway.

But enough about TFS-to-VSTS migrations. This post is about how I was trying to figure out how to approach migrating a GitHub repository to VSTS. This time, the problem was not about source code. VSTS has full support for Git, and pushing a Git repository to another remote is trivial. Here is a random blog post (by Esteban Garcia) about the procedure.

The Problem at Hand

What I had to come up with was how to migrate Github Issues and their associated Milestones. The repository I was migrating had not done any Pull Requests, so I could disregard that type of entity completely.

When I googled around for solutions I found several attempts of using the GitHub REST API to export issues into a CSV-format. In theory, I could use used the Excel TFS plugin to import these CSV-issues into VSTS… But, none of the scripts that I found actually worked the way that I wanted. Not even close.

So, that left me with the option of doing my own solution. Luckily, that turned out to be a good thing. The result went just the way I wanted it to be.

Migrating a GitHub Repository to VSTS

Migrating GitHub Issues to VSTS

The grand master plan was to use the GitHub REST API to get the information I needed, and to create iterations and work items through the VSTS REST API. To summarize, milestones were to be converted into iterations, and issues into work items.

Extracting Information from GitHub

I started out by making a GET request to list all issues for the GitHub repository, but quickly found out that the result was paginated, and I only got the first 30 or so… I had to repeatedly make requests for the next page, whose URL were hiding behind a Link-header in the response. It actually took me some time to figure this out, and it was not until I finally read the documentation that I discovered it. Note to self, RTFM

Then I noticed that most descriptions and comments where formatted in markdown. VSTS need to have its content in bare html, so I needed a way to convert the formatting somehow. Lucky me, the GitHub API has an endpoint just for that purpose!

I think its raw text/plain method is really convenient. If I ever find myself in need for markdown conversion once more, I will definitely consider to use the GitHub API again.

Creating Work Items and Iterations in VSTS

Now it was time to create some entities in VSTS, and I started with the iterations. The GitHub milestones have both title and description. Iterations just have title, so the description hade to be lost in the migration. Milestones have end date (due date, really) but lacks start date. My approach was that if a milestone had a due date set, I used the date that the milestone was created as start date for the iteration.

The hardest part was to find the name of the endpoint for iteration creation in the VSTS REST API. After some extensive research, I discovered that areas and iterations are called “classification nodes“ in REST API-language.

As I tested out creating iterations, I was reminded that some characters are not allowed in their names.

I find that these restrictions are quite interesting. I can imagine why some characters are not allowed, but there are also naming restrictions. Like for example that an iteration is not allowed to be named COM1 or AUX. How on earth could the backend software be written, if the name of an entity would risk the entity to be mixed up with some random parallel port?

Creating work items was a real breeze. One just compose a list of instructions of how the fields and states of the work item should be. The only thing that was a bit troublesome was that if I sent instructions to create several comments on a work item, only the last was actually entered. My solution to that problem was to first create the work item without comments, and then update it once for each comment that needed to be added.

A very nice feature of the endpoints for creating and updating work items is the bypassRules query parameter. It made it possible for me to both create and update work items while having the original GitHub usernames show up in their history.

Show Me Some Code Already!

The script is too long to be included in this blog post (Duh!), but here is a link to a GitHub repository of mine where you can get it, and also read more about the details of what information gets copied.

Be Weary of Gotchas

  • You need to be a member of the VSTS “Project Collection Service Accounts” group to be allowed to use the bypassRules query parameter.
  • I used basic authentication to login on GitHub. If you have an account with activated two factor authentication that method will not work for you.
  • Only milestones that have issues relating to them are migrated. Empty milestones are not included.

Lessons learned

  • Read the documentation.
  • Writing custom migration logic is not as hard using REST APIs as with the (dreaded, and outdated) TFS Integration Platform toolkit.

Automatic Testing With an In-Memory Database and EF7

If you have ever written automatic tests that runs against a real database, you might have noticed that the tests ran quite slow. To get around this problem, we instead target some kind of fake database which is kept in-memory.

To my knowledge, you could have done this in two ways while working with Entity Framework (EF).

One way has been to hide the DbContext behind some kind of abstraction. This makes it possible to replace the DbContext with simple list-objects when running an automatic test. For example the Effort project, or the more simplistic Nethouse UoW Pattern use this approach.

Another way has been to use a SQLite in-memory database, but I have never seen a solution with working code first migrations in EF. At least not until now.

New Capabilities of Entity Framework 7

With the coming arrival of EF7, code first migrations are finally supported with SQLite. Well? As long as you keep within the technical limitations of SQLite that is.

Another nice feature is the brand new InMemory database. Microsoft designed it to be a general purpose in-memory test replacement. Since it is not a relational database, things like migrations or referential integrity constraints will not work.

Target an In-memory Database

It’s relatively straight forward how to configure a DbContext derivate to target either SQLite or InMemory. But the way you configure it in your production code might prevent you do that in your tests. In the case of the .NET framework version of EF, the usual way to configure the DbContext is by overriding a method inside the class.

So how can you tackle the problem of how to configure the DbContext to use a test database? For instance, you can’t simply solve this by setting up a configurable connection string.

The InMemory database is a different sort of provider and has to be activated by code. The SQLite in-memory could actually work with just an updated connection string, in theory that is. But a SQLite in-memory database resets each time the connection to it is closed, and the DbContext open and close the connection a lot.

One could of course do this by adding extra code to the DbContext derivate, where one could inject configuration code to target the test database. But as always, isn’t it a bad practice to keep test code in the production code?

Luckily, in EF7 it’s possible to configure the DbContext when adding Entity Framework to a ServiceCollection instance. This configuration is rather verbose, but can without much effort be reused it in all your tests. This is my approach:

1
2
3
4
5
6
7
8
9
10
11
12
13
14
15
16
17
18
19
20
21
22
23
24
25
26
27
28
29
30
31
32
33
34
35
36
37
38
39
40
41
42
43
44
45
46
47
48
49
50
51
52
53
54
55
56
57
58
59
60
61
62
63
64
65
66
67
68
69
70
71
72
73
74
75
76
77
using System;
using System.Data.Common;
using Microsoft.Data.Entity;
using Microsoft.Data.Sqlite;
using Microsoft.Extensions.DependencyInjection;

namespace EF.TestUtils
{
public sealed class TestContextFactory : IDisposable
{
private IDisposable _connection;
private IDisposable _scope;

private int _index;
private static readonly object Locker = new object();

public TContext CreateInMemoryDatabase<TContext>() where TContext : DbContext
{
var serviceCollection = new ServiceCollection();
serviceCollection.AddEntityFramework().AddInMemoryDatabase()
.AddDbContext<TContext>(c => c.UseInMemoryDatabase());
var serviceProvider = serviceCollection.BuildServiceProvider();
var scope = serviceProvider.GetRequiredService<IServiceScopeFactory>().CreateScope();
_scope = scope;
return scope.ServiceProvider.GetService<TContext>();
}

public TContext CreateInMemorySqlite<TContext>(bool migrate = true) where TContext : DbContext
{
string connectionString = CreateSqliteSharedInMemoryConnectionString();
DbConnection connection = OpenConnectionToKeepInMemoryDbUntilDispose(connectionString);
var dbContext = CreateSqliteDbContext<TContext>(connection);
if (migrate)
dbContext.Database.Migrate();
return dbContext;
}

private string CreateSqliteSharedInMemoryConnectionString()
{
string name = GetUniqueName();
return $"Data Source={name};Mode=Memory;Cache=Shared";
}

private string GetUniqueName()
{
lock (Locker)
{
return $"testdb{++_index}.db";
}
}

private DbConnection OpenConnectionToKeepInMemoryDbUntilDispose(string connectionString)
{
var connection = new SqliteConnection(connectionString);
connection.Open();
_connection = connection;
return connection;
}

private TContext CreateSqliteDbContext<TContext>(DbConnection connection) where TContext : DbContext
{
var serviceCollection = new ServiceCollection();
serviceCollection.AddEntityFramework().AddSqlite()
.AddDbContext<TContext>(c => c.UseSqlite(connection));
IServiceProvider serviceProvider = serviceCollection.BuildServiceProvider();
var scope = serviceProvider.GetRequiredService<IServiceScopeFactory>().CreateScope();
_scope = scope;
return scope.ServiceProvider.GetService<TContext>();
}

public void Dispose()
{
_connection?.Dispose();
_scope?.Dispose();
}
}
}

Note that my utility class references types from both the EntityFramework.InMemory and EntityFramework.Sqlite NuGet packages. If you have a problem with that you can split up the class, but I find it rather convenient to have both capabilities in a utils-package that I reuse in all my test projects. And since we are dealing with test-code here, I do not think it matters that much if a NuGet-package to much is brought in.

To make it possible to switch out the DbContext derivative instance when running an automatic test, make sure you inject it in your production code instead of instantiating it there.

Creating an instance of the DbContext with test configuration can be done similar to this.

1
2
3
4
5
6
7
8
9
10
11
using (var factory = new TestContextFactory())
using (var context = factory.CreateInMemorySqlite<MyContext>(migrate: true))
{
RunScenario(context);
}
// Or...
using (var factory = new TestContextFactory())
using (var context = factory.CreateInMemoryDatabase<MyContext>())
{
RunScenario(context);
}

Avoid Configuring Two Database Providers During Test Runs

If you use the .NET framework version of EF, and override the OnConfiguring method to configure the DbContext, that method will be called even if you inject the configuratoin with help of the TestContextFactory. Therefore it’s a good practice to prevent cofiguration of multiple database providers in the following way.

1
2
3
4
5
6
7
8
9
10
11
12
internal class MyContext : DbContext
{
// ...
protected override void OnConfiguring(DbContextOptionsBuilder optionsBuilder)
{
if (!optionsBuilder.IsConfigured) // This prevents multiple configurations
{
optionsBuilder.UseSqlite(@"Data Source=c:\temp\mydatabase.sqlite;");
}
// ...
}
}

Entity Framework Code First Migrations

Note that you do not need to run migrations when using an InMemory database. In fact, it does not even support migrations at all. If you want to test migrations, you have to use a real database such as SQLite.

Migrations are very specific to the type of database that they are written for. This probably makes it a bad idea to test SQL Server migrations on a SQLite database. EF migrations will most likely contain raw scripts when data is affected by the requested change. Remember that the DbContext does not work in a migration? Therefore, you better use the same database technology in your migration tests as you intend to use in your production code.

When you think about what database to choose, in my opinion, you should definitely consider to use SQLite. Not only because its free of charge, but also because you will have a better testing experience with it. Not all apps need the extra horsepower that SQL server brings.

A great thing with EF is that your workflow will be quite similar, whatever database you happen to choose. Now go and test that database logic!

Database Migration With DbUp and VSTS

All too often I find myself in projects where there is no efficient strategy around updating databases. Databases should be able to be migrated to the latest version without too much effort. If it’s too hard, developers will start sharing databases, or even worse, use a test environment database directly.

If you usually do migrations by comparing the schema of two databases, now is an opportunity for you to do something better. Besides schema and security, a database also consists of data, and data is troublesome. Large tables takes both time and resources to alter. A tool simply cannot generate resource efficient migrations, or for example figure out where the data in that dropped column should go instead.

Therefore you will always need a process or another tool to run transitional scripts beside the schema comparer. If you instead focus on the transitional script runner and have it logging which scripts that has been run to some persistent storage, you can use that log as a simple means to version your database.

Also, do not forget to include configuration data, or sample data for test and development, in your migration process.

Run Migrations with DbUp and VSTS (or TFS 2015)

A favorite transitional script runner of mine have long been DbUp.

DbUp is a .NET library that helps you to deploy changes to SQL Server databases. It tracks which SQL scripts have been run already, and runs the change scripts that are needed to get your database up to date.

DbUp Documentation.

One way that you can get started with DbUp is by importing its NuGet-package in a .NET console project. But I prefer to invoke it through PowerShell. That way nothing needs to be compiled, and as long as you have access to your migration scripts you are good to go. The PowerShell way also makes a good match for deployment scenarios with Octopus Deploy or Release Management.

I have made a VSTS Build and Release Task for this purpose. But, if you would like to run DbUp elsewhere, the important part of the task is this PowerShell script.

Run Your Tools Often

As with all deployment tools, you should run them often. The more you run them the higher the probability gets that you will have found all mistakes before deployment is made to the production environment. This does not only mean that the same tool should be run in your CI builds, but also that each developer should use it to set up their own personal database. Never underestimate the value of dogfooding your deployment tools!

Non-transitional Changes

All database objects do not need to be changed transitionally like tables. For example regarding stored procedures and security objects, a more pragmatic approach is to keep a set of idempotent scripts that are run on each deploy. This is supported by the PowerShell script above with the Journal parameter.

Pay 151 SEK - Get 2400 SEK Back as Azure Credits (Microsoft Developer Program Benefit)

I just recently got an email from Microsoft where they advertised one of their latest Azure drives. They now give monthly credits to all who got a Windows- and/or Windows Phone developer account.

If you have not got one already, my guess is that you will receive this benefit as well when you register. Just head to Windows Dev Center and sign up. To get an account you have to pay a minor fee, equivalent to 151 SEK.

Develper Program Benefit

To collect your monthly credits enter Visual Studio Dev Essentials, and follow the link Access your benefits. Then look for the Developer Program Benefit tile.

Microsoft Developer Program Benefit tile

(Don’t forget the 6 month free Pluralsight subscription either!)

Activating the Developer Program Benefit creates a new Azure subscription for you.

Monthly Microsoft Developer Program Benefit

Personally, I will use this for making backups of my NAS to Azure Blob Storage. What will you do for your “free” credits? You can get a lot of fun for 200 SEK worth every month. Pay 151 SEK, and get 2400 back is IMHO a really good deal!